10. Tables
Now to wrap this document up, there is only one clause left to create, and that is the signature block. If we take a quick look at the source document, you can see that the signature block is set up as a table where the borders have been made invisible. The table itself is stretched across the width of the document. And where the template author has also included some comments, that require us to repeat some of the conditional logic that we used in the introductory clause.
Create a new table
So the same questions are being asked here: is the consultant a legal person, yes or no? Depending on the answer to that question, different content should be shown.
So let’s take a look and see how we can recreate that setup in ClauseBase. Now before we move on to that, you can see that the edit menu has quite a few tabs open, which we don’t need anymore. Which is getting a little bit cluttered, we can close them all individually. But a quicker way of doing this, is just to hold down the shift key and then close one of these files that are currently open. Then automatically all of them close all at the same time.
So now we can move on to the creation of a new library clause. We don’t really have a folder to place the signature clause in, so we’ll just create a new folder called signatures. We’ll place this new clause inside of that folder, the same file name can be something basic like for example signature block. Ordinarily we would be creating the content title if there were any for this particular clause, there isn’t any so we can just leave it open, and the content body via the import mode.
But if we take a look at the global panel, you can see that this mode is not really optimized for creating tables and so there’s a better way to approach this for tables, which we’ll take a look at now. So we’ll go into the content body and manually construct this table. Now in order to create tables in ClauseBase, you construct cells by using two pipe symbols to mark the beginning of a cell and two more to mark the end. If you then add two more after that, then you can see that you’ve created two cells right.
The first two pipe symbols mark the beginning of the first cell, the pipe symbols in the middle mark the end of the first cell but also the beginning of the second cell and then the last two mark the end of the second cell. You have now created two cells, so you’ve essentially created a row here.
If we now fill out some contents like for example for the consultants and for the company. If we then save and insert that clause, then you can see that we have created our first row. The only thing we need to do then is to repeat that exercise three more times in order to create a total of four rows, where we can then start adding new content. A quick look back at the source documents says that in the second row we need to include some room for the consultant and the company to include their signatures. And in the final two rows we’re filling out the name and the function.
Conditionality
Now the signature cells, the dotted line so to speak are a little bit special. So let’s first take a look at the name and the function and then we can move on to the signature to the dotted line cells so to speak as a second part.
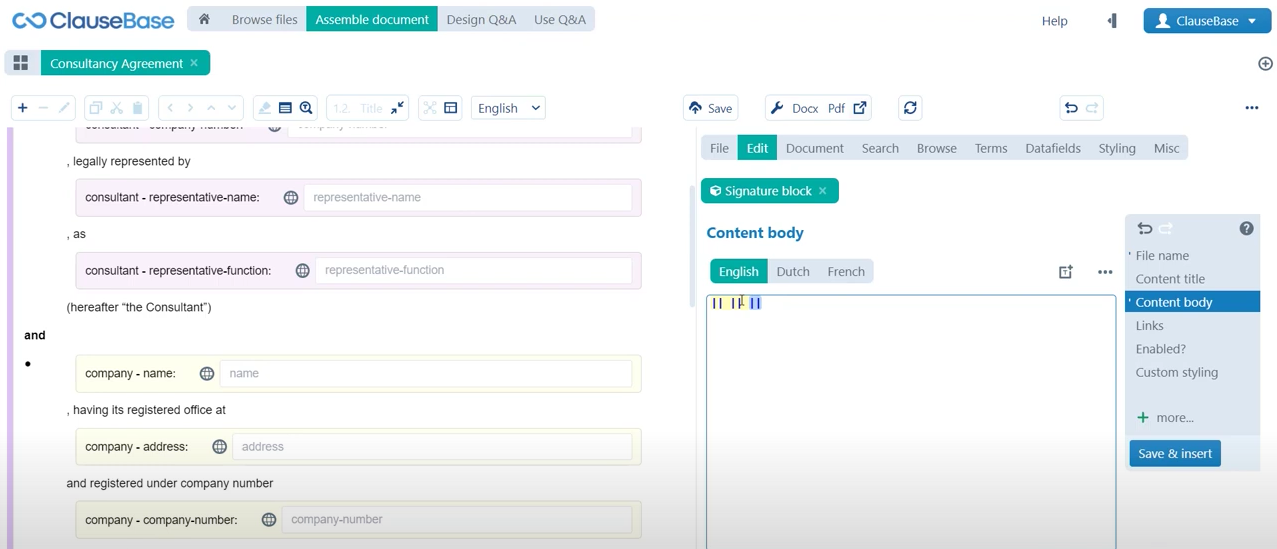
So first of all we’re filling out the name, here the template author for the consultant has indicated that if the consultant is a legal person, then the name of the representative should be shown. If the consultant is a natural person, the name of the consultant should be shown. So we’re just reusing the datafields and the conditional logic that we have already created.
- Again we’ll start with a curly bracket and if you don’t remember the datafield that you used for this earlier you can also hover your mouse over this consultant item here at the bottom of the screen. Then you can just click the datafields to automatically insert it in the documents and then we just complete the rest of the condition. So if it is true that the consultant is a legal person, then we are including and then we can do the same thing here, the consultant’s representative name. But if it is false then we are simply including the consultant’s name.
- Then we’ll close that condition off and we can also obviously move the table a little bit to make everything a little bit clearer, and a little bit easier to work with.
Then for the company, the issue is a little bit more simple. So we can then just say that we are referring to the company’s representative name. For the function we’re dealing with a similar issue, except this time no content should be included if the consultant is a natural person. So in other words the content in this cell should be subject to the condition that the consultant must be a legal person.
- That just means that we’re writing the same condition, so consultant legal person is true and then we’re just writing the function of the consultant’s representative. But we’re not providing ClauseBase with any situation, where that situation might be false, because of course no content needs to be included. So we can just subject the contents of this cell to the exclusive condition of the consultant has to be a legal person. Again the function for the company’s representative is fairly basic, we just include the company’s representative function.
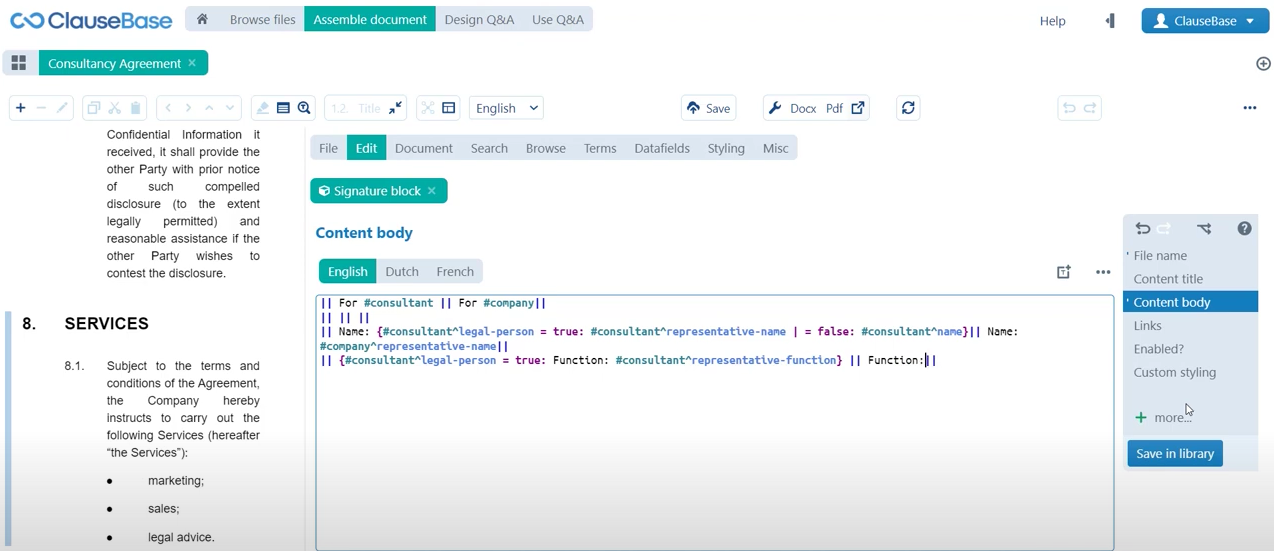
Table styling
If we now save that document in the library and save that clause in the library, we can see that these changes are added. That brings us to the signature clause, now you might be tempted to just write something along the lines of signature and then a whole lot of dots. But that doesn’t really reflect, as you can see here the appropriate style for this particular cell.
- So what you can do is, you can use a sort of special command to automatically style this particular cell as the cell where a dotted line for a signature needs to appear. You do that by writing percentage, signature, percentage. So now you’ve defined the formatting the style of that cell and you can still include some content like for example signature, colon. We can then copy all of this contents to the second cell and there you can see that a proper formatted cell is automatically generated.
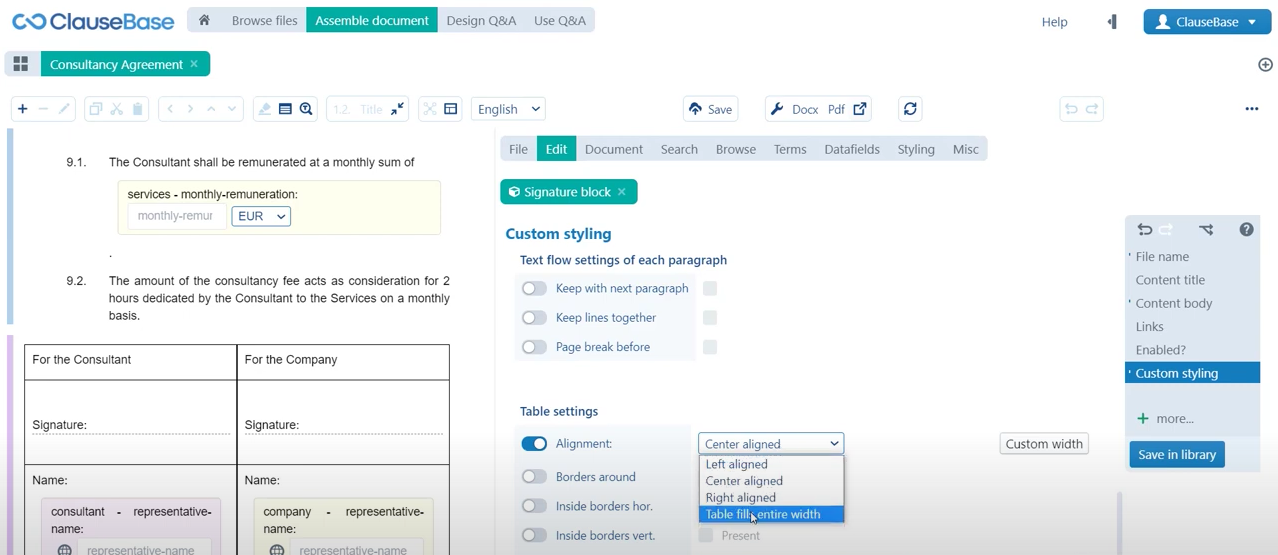
Now of course that means that the content for this particular clause is up to date, that it is in line with the source document. But the look and feel is still far from ideal, in order to hide the borders, in order to stretch this table across the width of the document, we are going to have to set up some custom styling. Because as you can see, the current table styling is the default styling and so we need to diverge from this default styling. For this individual class we’ll go to the custom styling and so the custom stylings body.
If we then, because obviously you do have the option to also adjust the title, but here we’re working in the content body. If we then scroll all the way down, you can see that we have several table settings.
- The first one is the alignments, now the default setting says that the table needs to be aligned centrally. But we want it to fill the entire width of the document.
- Then we can also portray how the borders should be used. So in this case we can toggle these settings on and you can see that the borders around are typically portrayed as being present, we can turn that off individually for each type of border. Both the borders around the inside borders horizontally and the inside borders vertically.
If we then save this clause in the library, you can see that it actually reflects the formatting of the source document. We can create an export to actually see what that would look like in practice, aside from just the interactive preview.
Quickly want to see an interactive preview of your document? Just hold down the shift key, as you click the pdf button, and then as you can see an in-platform preview is generated of what an exported pdf document would look like.
Then you can see here that the clause features the correct look and feel when compared to the source document. There is only one minor tweak that we can still make, which is that there is far too little space between this top of the table and the fees clause, or currently the last clause. If you take a look at the source document you’ll see that it actually features a little bit more space as you can see here. So that’s also something that we can set up from the custom styling menu.
- Here we’re just going to create some additional block spacing above this clause so let’s maybe set that to one centimeter. You can choose which unit of measurement you would like to use, let’s use one centimeter for now and then you can see that this space has been created.
Do you want to learn more about this chapter? Check out our help page on introduction to tables.