ClauseBase can prepare documents for electronic signing, and subsequently submit the prepared document to the e-signature provider, such as Connective, Dropbox, HelloSign or Scrive.
There are quite some moving parts involved when preparing a document for automated electronic signing. Accordingly, be aware that this is an advanced subject, and that your account profile needs to support various advanced functions. Also, be aware that not all ClauseBase subscriptions support electronic signing.
E-signature terminology
By way of introduction to e-signatures, it is important to know a few terms and concepts. (These terms differ somewhat between e-signature providers, but the basic ideas remain consistent.)
Role of ClauseBase
ClauseBase does not sign any of the documents — this is the role of the e-signature provider, with whom you need a separate subscription.
ClauseBase merely submits a PDF-version of the document to an external signature provider, accompanied by a few extra details, such as the roles and names of the parties involved and the physical location where the signatures must be placed in the PDF document.
Once submitted to the e-signature provider, the role of ClauseBase in the signing process is over, and you will need to use the e-signature provider’s tools (e.g., its signing portal) to receive signed documents, check the status of signatures, withdraw documents, and so on. None of those functions are offered by ClauseBase.
Stakeholders
In an esignature process, multiple “stakeholders” are present that can have multiple roles.
In their simplest form, those stakeholders are signatories. However, a stakeholder can also validate a document (i.e., approving upfront that the document can indeed be signed, or instead rejecting it), and may also be flagged as a person who will receive the signed document. For each natural person involved, one or more of those three roles — validating, signing and receiving — will apply.
For example, while a credit controller may only validate the signing process for a certain document, and a backoffice assistant may only receive the signed document, a general manager may simultaneously sign and receive the document.
Authentication methods
Before a stakeholder can sign a document, she needs to be authenticated by the e-signature provider. Which type of authentication is provided will depend on the e-signature provider and your subscription, but currently the following three options can be activated through ClauseBase:
- Email authentication is typically the cheapest and fastest type of authentication, but also (relatively speaking) the least secure of the three authentication methods. Typically the signatory will receive a link or a code through her email address. This link/code then needs to be used in order to login to the e-signing website.
- In SMS authentication, the e-signature provider will send a code via SMS to the signatory’s mobile phone. Because SMS traffic is more difficult to intercept, this method is a bit more secure than email authentication. However, because of external costs to be paid by the e-signature provider to the telecom provider, it may also be a bit more expensive than email authentication.
- Local authentication types are the most expensive, but also tend to be the most secure. For example, in Belgium, the Itsme authentication method offers an advanced yet user-friendly authentication system through end-user smartphones, that is even trusted for banking transactions.
Be aware that these three authentication methods may have different legal implications in certain jurisdictions, due to the different level of security involved.
While even the relatively least secure option (email authentication) is — generally speaking — probably more secure than a traditional handwritten signature, courts across the world are very inexperienced in this subject matter, and some tend to frown upon these electronic methods. Some local legislation may also prohibit or mandate certain types of e-signatures, depending on the type of transaction involved. For example, in Belgium, transactions with employees are subject to specific legislation that raises the security bar.
Set up an integration with an e-signature provider
In the dropdown menu below the top right button of your screen, click on Integrations.
Next, add a Service instance for an e-signature provider. In the screen below, we use the example of Connective.
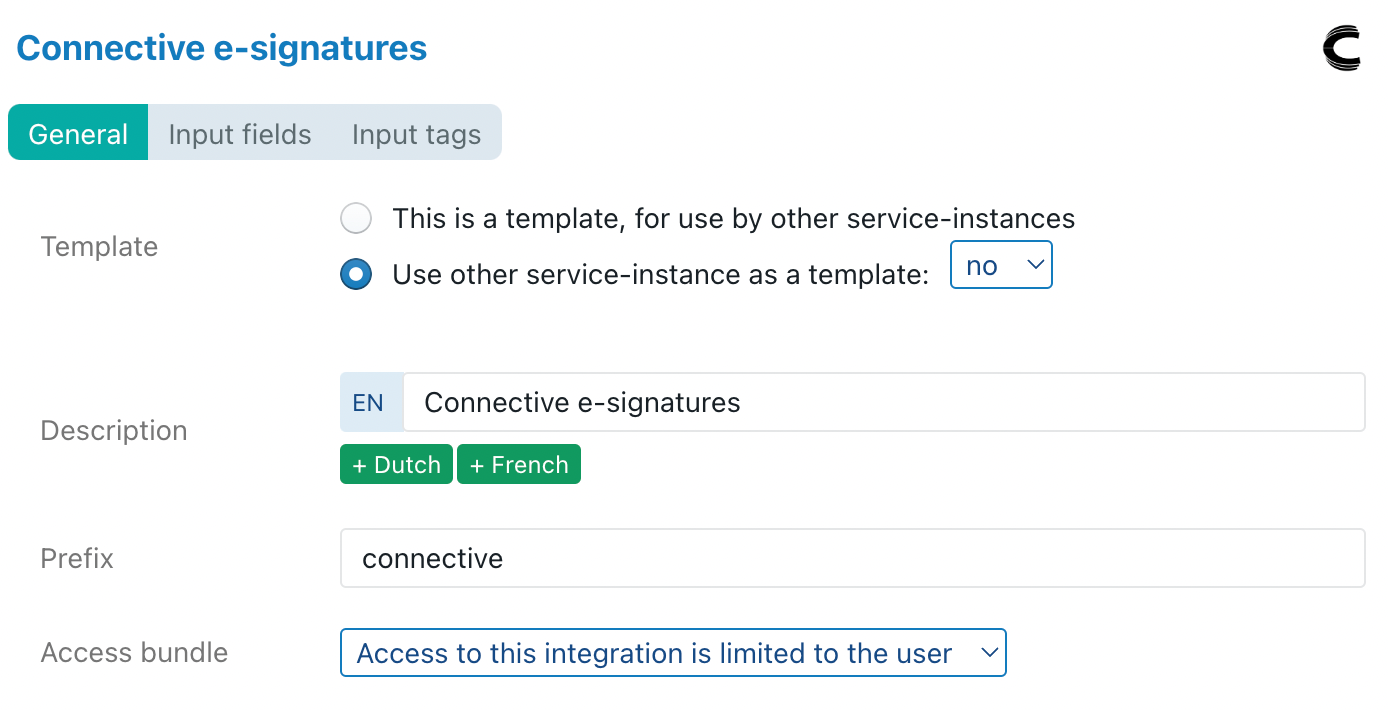
The General tab contains only one part that you may want to change: the Access bundle setting. It allows you to specify who has access to this e-signature service instance. The other properties can probably be ignored, but for the sake of being exhaustive:
- The Template allows you to merge different e-signature templates together. This is a very advanced operation, so you can probably keep this set to no.
- The Description box allows you to give a title to this service instance. You can fill in anything, as long as it is sufficiently descriptive for you and your colleagues.
- In the Prefix box you can probably leave the suggested prefix as-is. This is only relevant in very advanced scenarios, where different types of e-signature service would be created.
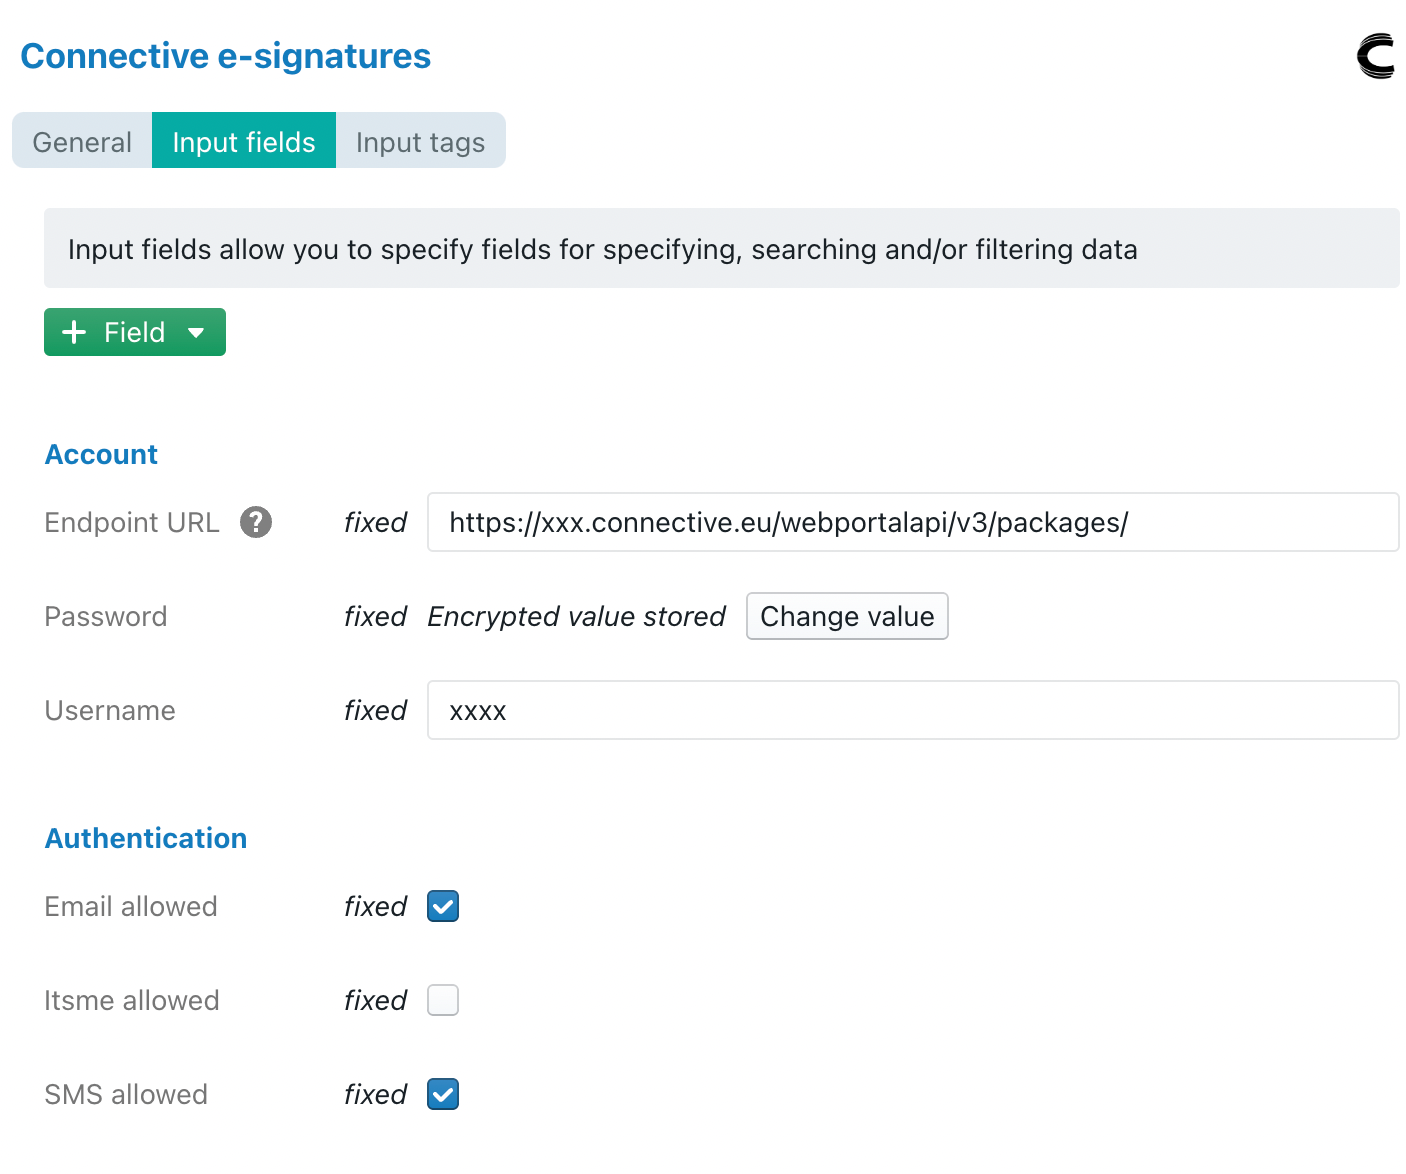
In the Input fields sheet you need to your account name (a URL in the case of Connective), password and username — these should have been provided to your by your e-signature provider.
In addition, you can choose which signing methods are allowed to be used by end-users. If you disable a signing method here, it will be disabled for all documents and all users. Note, however, that even if you enable a signing method, individual documents may disable it on a case-by-case basis.
The Input tags sheet can be ignored for e-signatures. (It is a standard section that is shown for each type of integration, but is not very relevant for e-signatures.)
Prepare signature blocks in a document
Similar to a paper document, you need to reserve some space in your document to actually position the signature of each party.
In ClauseBase, you reserve such space by using the @sign special function within a clause — probably as part of a table cell, or some other typical signature clause. For example:
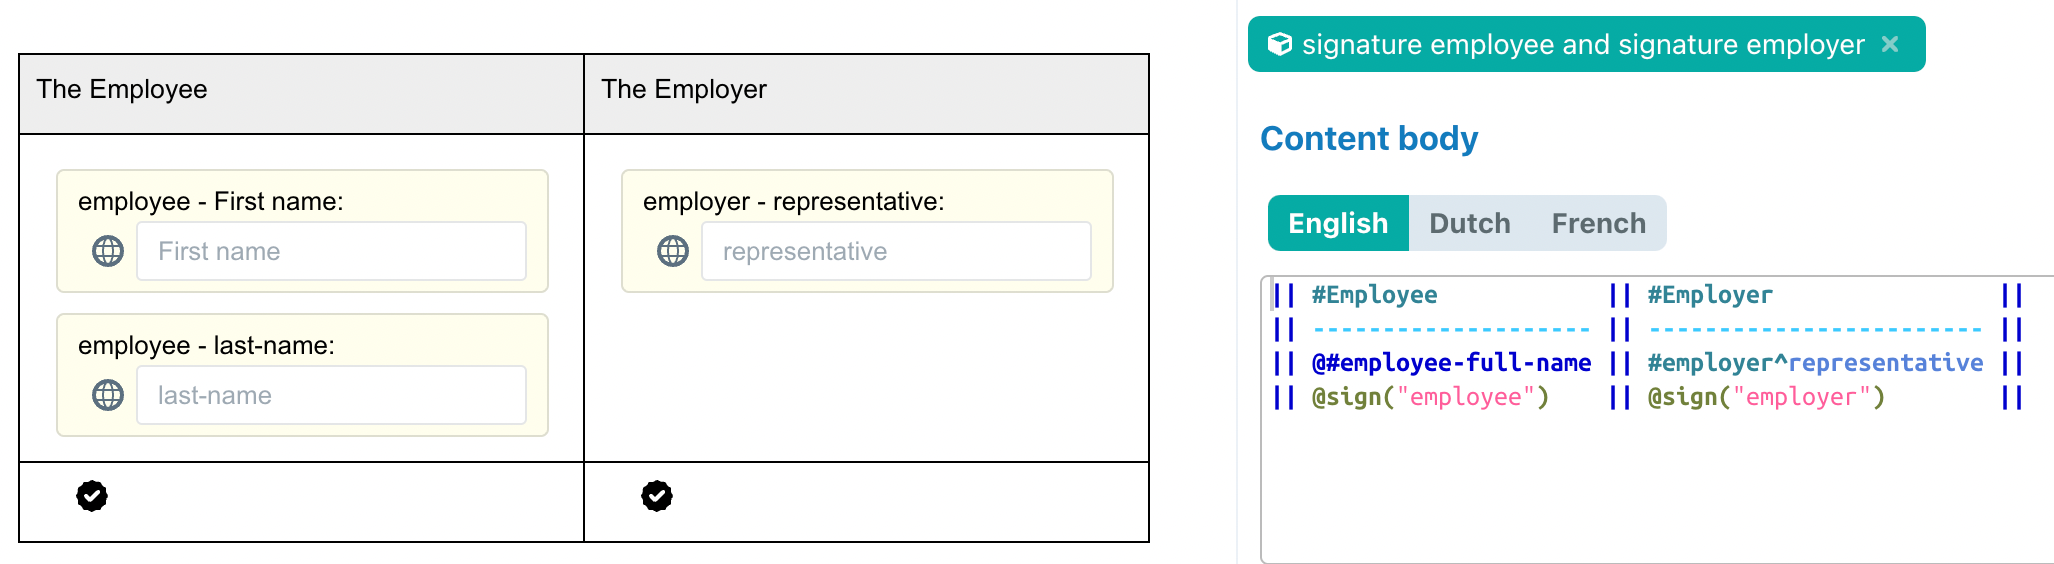
For every person that should sign, you invoke the @sign function, with the relevant name as the sole parameter (“employee” and “employer” in the example above). The signature name will be presented to the Q&A user, so make sure it is sufficiently clear which type of party you are referring to.
When submitting the document to the e-signature provider, ClauseBase will flag the location where the @sign function is used as a relevant signature area.
Preparing a Q&A
It is not strictly necessary to take special steps to prepare a Q&A for electronic signing. Assuming that the following conditions are all met, the user can initiate e-signing:
- the end-user has the right to electronically sign documents
- the end-user is granted access to at least one e-signature service instance (i.e., the Access Bundle setting of at least one e-signature service permits access to the end-user)
- the underlying document contains at least one @sign special function
However, when no further preparations are taken, the software will not be able to automatically fill the name and contact details of each signatory. In addition, several configuration options for the e-signature provider will probably not be set in the way you want them to be.
Both the contact details mapping and the e-signature provider configuration heavily rely on ClauseBase’s powerful global placeholders system, which offers a refined system for setting default options at many different levels, to facilitate the management of contracts. You must understand this placeholder system before proceeding.
Mapping contact details
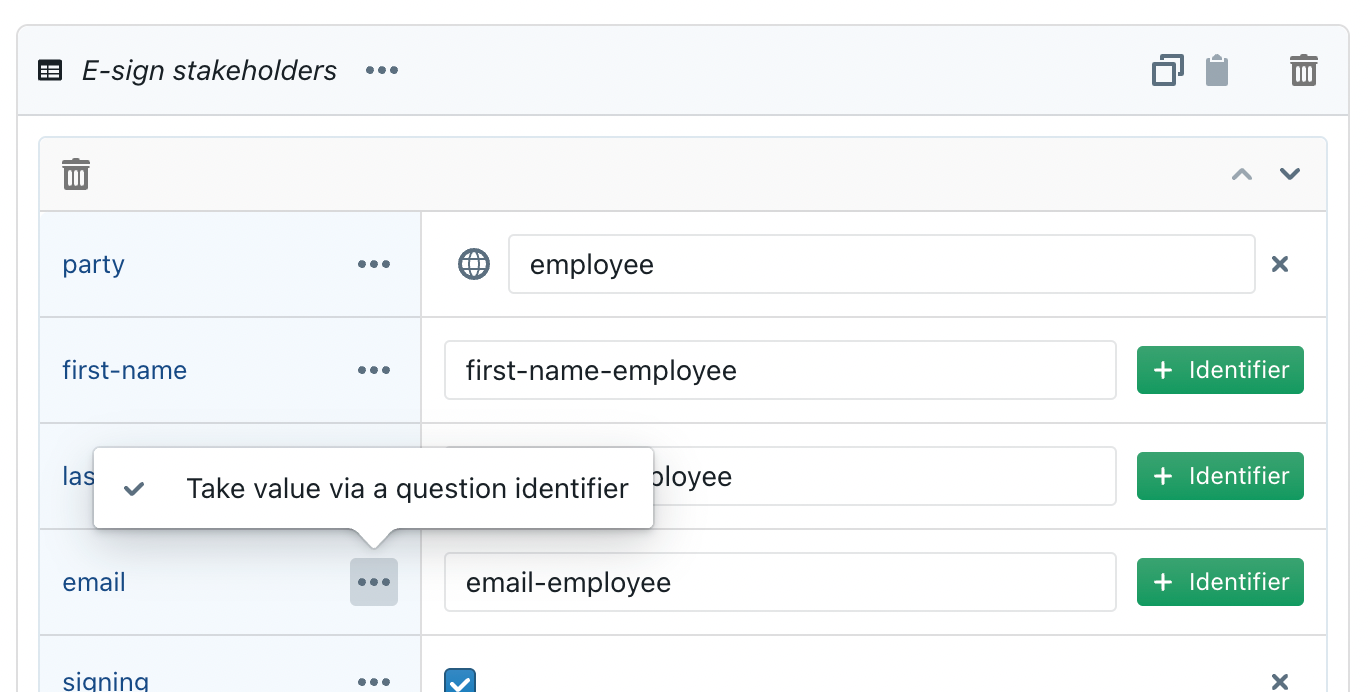
For each of the “stakeholders” in the e-signature process, a separate record (i.e., table row) needs to be created as part of the e-signing global placeholder:
Creating the e-sign global placeholder.
Create a new global placeholder System-defined > E-signing > E-sign stakeholders. This is a table-based placeholder with rows & columns.
As explained on the global placeholders page, such placeholder can be inserted at many different levels, e.g. at the customer account level so that it applies to everyone, or at the group level, or at the individual user level, or at the level of an individual Q&A.
As this placeholder is table-based, you can even combine rows from multiple levels. For example, you could create an instance of this placeholder at the customer account level, and insert the CEO’s signature details there, so that the CEO’s signature details will always be available. Then, at the level of a group, you could add a particular general manager’s signature details. And at the level of an individual Q&A, you could even conditionally insert certain rows with signature details, depending on whether certain options are chosen by the Q&A’s end-user.
Configuring the e-sign global placeholder
The software will then create the following list of columns for you:
| Column name | Data type | Explanation |
|---|---|---|
| party | text | The internal name for this party, which will be displayed towards the end-user at the left side of the signatory dialog box. For signatories, this name must match the parameter specified in the @sign special function, as used in a clause body (e.g. employee or customer). For parties that validate or merely receive the document, you can use any name — as long as it’s unique. |
| first-name | text | The first name of the natural person who will sign/validate/receive the document. |
| last-name | text | The last name of the natural person who will sign/validate/receive the document. |
| text | The email address of the natural person who will sign/validate/receive the document. | |
| phone | text | The cell phone number of the natural person who will sign the document, if the SMS option is chosen as an authentication mechanism (see below). |
| signing | true/false | Enable or disable a person’s signatory role. (Note that in order to qualify as a signatory, the party name must also be used in a @sign special function currently present in the document.) |
| validating | true/false | Enable or disable a person’s validation role. |
| receiving | true/false | If set to false, then a person will not receive a copy of the signed document, once all signatories have signed. |
| disallow-sms | true/false | If set to false, then the SMS authentication method will be disabled for this person. (Note that the SMS authentication method must also be enabled at the level of the service instance / integration.) |
| disallow-email | true/false | If set to false, then the email authentication method will be disabled for this person. (Note that the email authentication method must also be enabled at the level of the service instance / integration.) |
| disallow-itsme | true/false | If set to false, then the Itsme authentication method will be disabled for this person. (Note that the Itsme authentication method must also be enabled at the level of the service instance / integration.) |
| no-email-notifications | true/false | If set to false (by default it is set to true), then no emails will be sent to notify a person about important events during the signing process. You typically do not want to set this to false, but there are exceptions. For example, to avoid that your CEO would receive hundreds of individual emails requesting her to sign a certain document (which is unnecessary when she always open the e-signature provider’s signing portal at the end of every working day to perform bulk-signing), you may want to set this to false. |
| order | number | The order in the validation / signing process. If not every party has the number, then higher numbers will get involved at a later stage. For example, if both the CEO and some general manager must validate a document, and the CEO’s order number is set to 1, while the general manager’s number is set to 2, then the CEO will be invited to validate first. If she would reject the document, then the general manager will not even be asked to approve. If, instead, both the CEO and the general manager are set to the same number (or no number at all), then both persons will be asked to validate at the same time. |
Configuration hints:
- Typically you will want to create one row per stakeholder.
- You may want to consider spreading those rows across multiple levels — e.g., both at the customer account level and at the level of an individual Q&A — and then combine all those rows through the “Append” option for table-based global placeholders). This allows you to ensure that certain signature data will “ripple through” to all the Q&As.
- Instead of hard-coding fields such as first-name, last-name, email and phone, you may want to set those cells to Take value via a question identifier, and then refer to the relevant question in the Q&A where that person’s details are filled in by the end-user (or perhaps chosen from a predefine, or from a spreadbase).
You can of course, also link fields such as signing and validating to Q&A answers (e.g., because there is some logic involved to determine whether or not a certain party will have to validate), but it is less common to do so.
- Using question identifiers also allows you to reuse change-sets across Q&As, either by physically copying a Change placeholder from one Q&A to another, or (even better) by importing such a change as a proxy. If both Q&As use the same identifiers for the same questions (or even import those questions through proxy cards), ClauseBase will insert the answer to those questions into the placeholder’s cells.
Additional e-sign options
In addition to the global e-sign table-based placeholder for configuring the individual stakeholders, you may also want to specify the following options, through separate global placeholders:
- System-defined > E-signing > E-sign disallow end-user to change options. If set to true (the default is false), then a user cannot configure the roles and authentication methods of each stakeholder. This effectively hides the Show options button in the bottom-left corner of the e-signature dialog box.

- System-defined > E-signing > E-sign (Connective) document group code. This allows you to submit a DocumentGroupCode text to e-signature provider Connective.
- System-defined > E-signing > E-sign (Connective) initiator email. This allows you to set the email address of the person who submits the document to Connective (the “initiator”). When not set, the email address of the end-user’s ClauseBase account will be used.
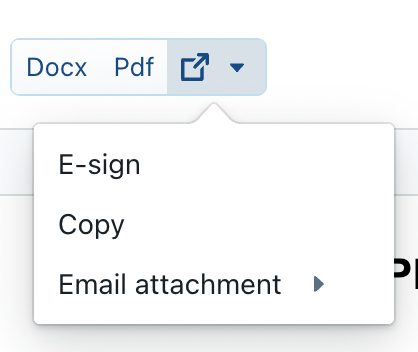
Initiating the e-signing process
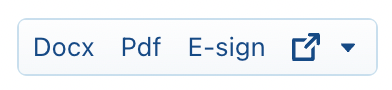
The e-signing itself can be started through the export button at the top of the document. Instead of pressing Docx or Pdf, the user can click on the dropdown menu and choose E-sign.
If you want to “promote” the use of e-signatures for certain documents, you can also insert a global placeholder System-defined > Export buttons > Promote E-sign Export Button and set its value to true. The result will be that the e-signing button then gets “promoted” to the top bar, instead of being part of the dropdown menu.