2. Alternatives
ClauseBase allows you to augment your clauses by linking them to other clauses and thereby indicating that those two clauses are alternatives of one another. That way you and your users can quickly switch between potentially useful clauses on the fly.
The first instance where we can use this is in the new services clause. If we take a look at the base document you can see that the template author has indicated that these need to be alternatives of one another.
Q&A users do not have the option to switch between these two alternatives because the alternatives functionality is exclusive to document assembly.
Now, let’s actually enact this link for the document that we have open in ClauseBase right now. As stated earlier, it’s essentially just a link between two clauses.
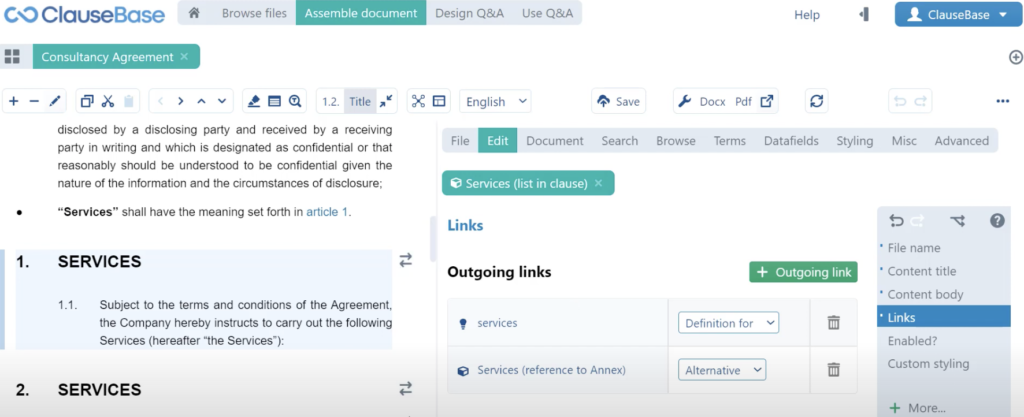
🔗 Links are something that we’ve used in the framework of cross-referencing, but it’s easy as well to not just link to a concept but also to a clause.
Linking alternative clauses
So, if we open up one of these clauses that we’re going to be linking to, we can then navigate to the links menu as mentioned earlier. This clause is already linked to the concept of services, specifically that this clause serves as a definition for the the concept services which is why this definition is portrayed here. Now we’re going to create a new link and we’re not going to link the clause to the concept of services – rather, we are going to link it to the alternative clause that we created previously where a reference is made to the Annex.
🔗 You can see that the new link is added to the menu as soon as we click “Save in library”.
💡These two arrow icons will pop up next to the clauses and they will indicate that alternative clauses are available. If you then click that icon you can see which alternative clauses ClauseBase has found and you can switch between them on the fly.
Note also that as soon as we remove this “list in clause” clause from the document, the definition for services disappears because the clause creating the definition for that term is no longer in the document. That’s really all there is to to alternatives.
One other way to create these alternatives exists and the way that we’re going to be looking at that is by creating the new Annex that we saw earlier, but for now we can also just remove this original clause from the document. This will not delete the clause in in its entirety, this will just remove it from the document. We can do that by selecting it and then clicking this “– icon” in the top left hand corner.
Then, as for the Annex, let’s take a look at the source document. It’s located all the way at the bottom of our Word file where you can see that two alternative clauses are added. One is a table that sets out the services and one is a clause that sets out the services. The table is the default option, the clause is the alternative option. As you can see here now, since an Annex is a separate sub-document, it’s not necessarily part of the main agreement. It can exist on its own. We will also be creating a new document in ClauseBase and we will be adding the two – the main Consultancy Agreement and the Annex together later.
So, moving on back to ClauseBase. We are now creating a new empty document by clicking the “+ icon” in the top right-hand corner. We are starting by filling out the file tab where we can indicate that the name of the document and how it’s going to be portrayed in the library is something along the lines of “services annex”. We can ignore the document category for now.
📁 We can indicate that this document is a template and not a concrete contract that we’re creating for a client and then by default it will be stored in the “My documents” folder.
So, we’ll save the document. That means that it has now been created. One final thing that we can do is we can add a document title. If we quickly switch back to the Word file then you can see that it says Annex 1 –Services. So here we will write Annex 1 – Services and then it’s just a matter of adding our two alternative clauses. I’ll go through the process very quickly here to create a new library clause. We are automatically prompted with the the Services folder in the library and that seems like a terrific location to place this clause. For the file name we’re going to choose a name that allows us to quickly see what this this clause does andwhat it is primarily for. So let’s go with “Annex Services in table” and I feel like that gives us sufficient information to distinguish from the other services clause that we have in the main Consultancy Agreement. There’s no content title for this table so we can move on with that.
Styling the table
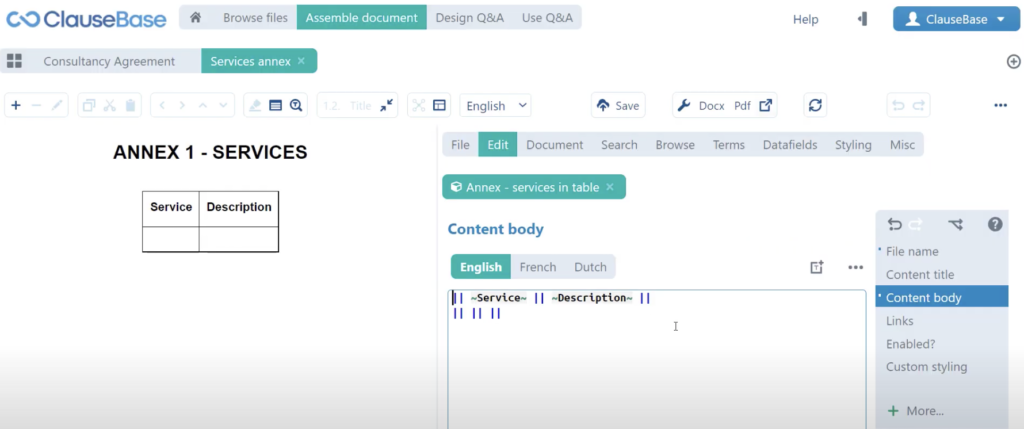
Then, we can just start recreating the table in the content body which, as you will remember from the signature table that we created earlier, is done by creating these virtual vertical pipe symbols (||) that indicate the beginning and end of a cell. If we do that three times in a row here and three times in a row here then we’ve essentially created a table with two columns and two rows.
If we take another quick look at the original table we can see that this first row contains the the word “service”and the word “description” in bold so we’ll add that surrounded by tilts (~) and we’ll write service (~service~)and here surrounded by tilts we’ll write description (~description~).
We can also create data fields here. As you can see that’s something that we’re going to tackle in a different chapter because as you can see here an individual table row should be created for each service that the consultant provides. That’s another advanced functionality that we’re not going to focus on just yet.
So that’s essentially it for the content here. Now, of course this is still a far cry from the look and feel that we have in our source document. So what we’ll do is we will first indicate that this row is a header row – that means that the this gray background will be provided and that also gives us some more flexibility on the styling front. The way that we indicate certain cells to be header cells is by creating a new row below the header and just creating three dashes (—) and you can see that ClauseBase recognizes what you’re doing because the dashes change color.
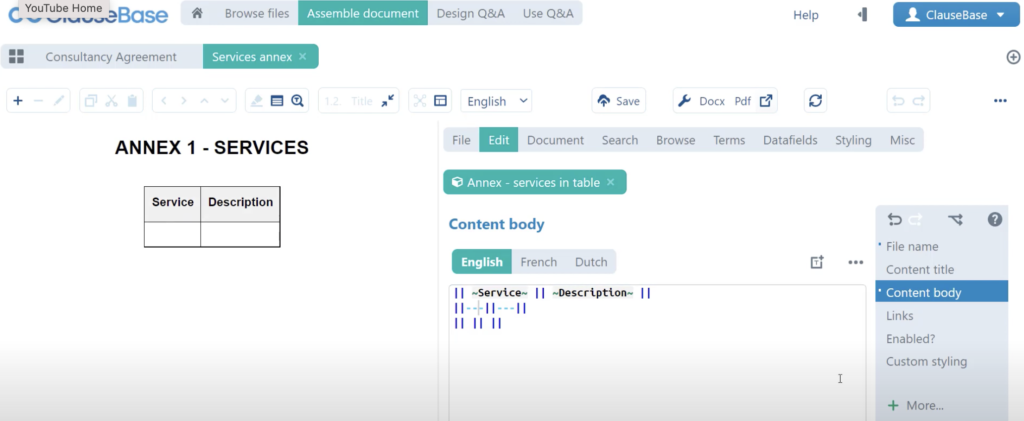
ClauseBase knows that you’re creating a header row here and as you can see as soon as we click “Save in library” that header is now portrayed in gray. But, even more importantly, if we go into the custom styling menu and create some custom styling for the body you can see here that we are given the option to give a different background to header cells and a different background to body cells. That gives me us more flexibility on the styling front. For now I’m happy with this this gray background so we won’t be going into detail on that anymore.
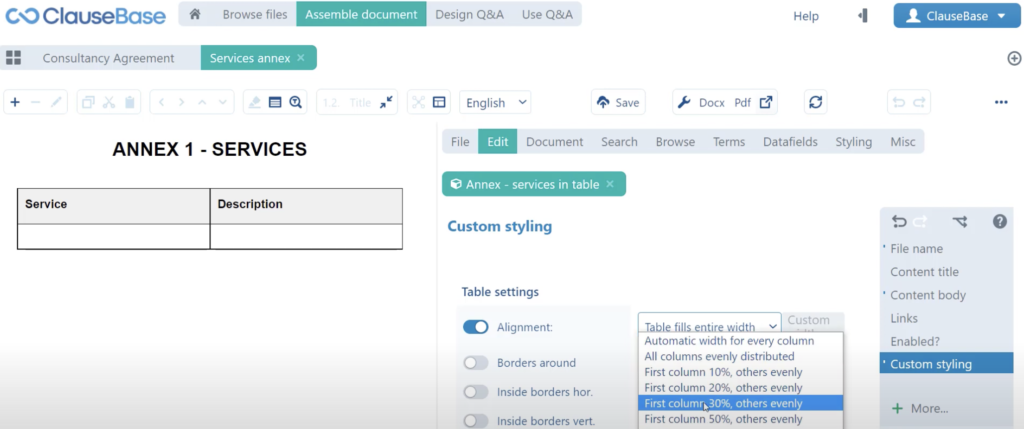
What we will do however, much as we did for the signature table, is we will indicate in the alignment settingsthat the table needs to fill the entire width. Finally, we also see that the services column is significantly smaller than the description column. What we will do here is we will indicate that the cell width needs to be set to let’s say 30% for the first column and 70% for the second column and that approximates themeasurements of the table in the source document a little bit better. That’s essentially it for our first alternative.
Let’s go ahead and create our second alternative clause. We will create a new library clause. We’ll call this one not Annex services in table but rather services in clause or clauses. We’re going to put this s in between brackets because as you can see here an individual clause should be created for each service the consultant provides, so we know that this is a clause that’s going to be multiplied a few times because we potentially have multiple services. For the content title we can see that it says service, colon and then a data field which, again, we’re not going to be immediately including. For the content body we can see that it says description in bold in the first paragraph and then a data field which, again, we’re not immediately including and then a second paragraph that contains this text.
Now, you may want to copy it and then paste it using the paste optimization.
However, the intelligence derived from that paste optimization comes from all the other concepts that are already used in the document. We’re currently dealing with an empty document, so ClauseBase doesn’t know where to draw its conclusions from which means that we will have to manually add these concepts.
The basic rules apply there. Of course you first remove the article, put a # in front of the term that you want to turn into a concept and you capitalize it if it is at the start of a sentence. So, for #parties that’s okay, for services we note that there is no article included in front of services. It doesn’t say these services so we are writing “–“ and then a lowercase services because it’s not at the start of a sentence and the minus refers to the fact that we’re dropping the article. The consultant, same as the parties, remove the article, write a # and then keep the “c” capitalized because it’s at the start of a sentence. Finally, for the services, we are removing the article, writing a # in front of the term and using a lowercase “s” because the concept is not at the start of the sentence. Then we can save and insert and then we have our second alternative clause.
Now to link these two together, we could again just establish an outgoing link from one clause to the other. But, there is an interesting alternative way to create these alternatives which is done by linking two clauses to the same concept. This essentially indicates to ClauseBase these clauses refer to the same subject matter therefore they must be alternatives of one another. So, if we create an outgoing link from this second clause to the concept of services, it will not indicate that this is a definition for but rather this concept just implements the services.
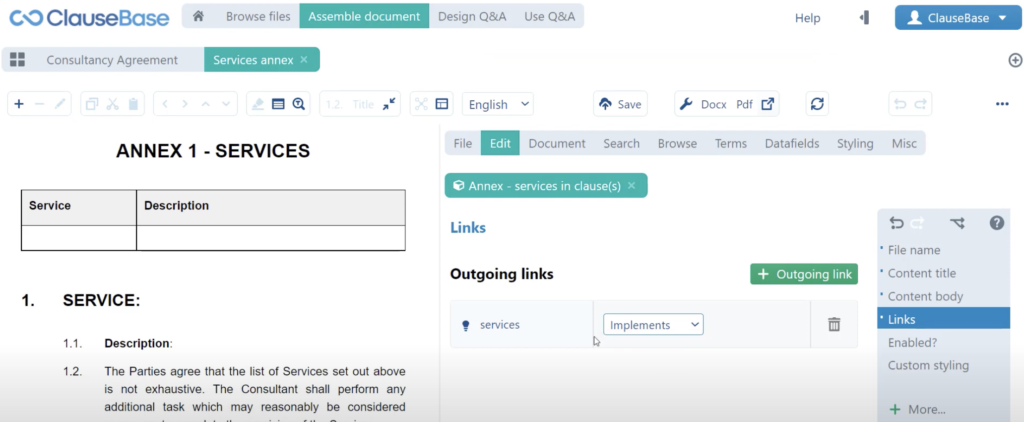
That means that it has the services as its subject matter. Then we can save that in the library and then we can do the exact same for the the first clause that we created. So we’ll go to the links menu and we’ll establish a link to the services concept. We’ll quickly save this in the library and a new alternative icon pops up. We will quickly do the same for our our second clause and then here also the alternatives icon pops up and that allows us to switch between these two alternatives as well. So, that’s another interesting, secondary way to create alternative clauses and that’s essentially it for the different ways in which you can create alternatives.
For more information on some of the topics discussed in this chapter, make sure to check out: