ClauseBase offers both a traditional REST API and a modern GraphQL API for even more advanced querying.
Prerequisite: retrieving an API-key
Both the GraphQL and REST API require a specific key, associated with each user-account. Such key will be a string of three digits, an underscore, and 32 more digits (e.g. “168_9b141639fdb2471bb4ed457d74a569cc”).
Each API-key is associated with a specific user-account, but is at the same time independent from a user’s password. It is stored as a hash on the server, and can thus not be retrieved if lost — a new key must instead be generated in such case.
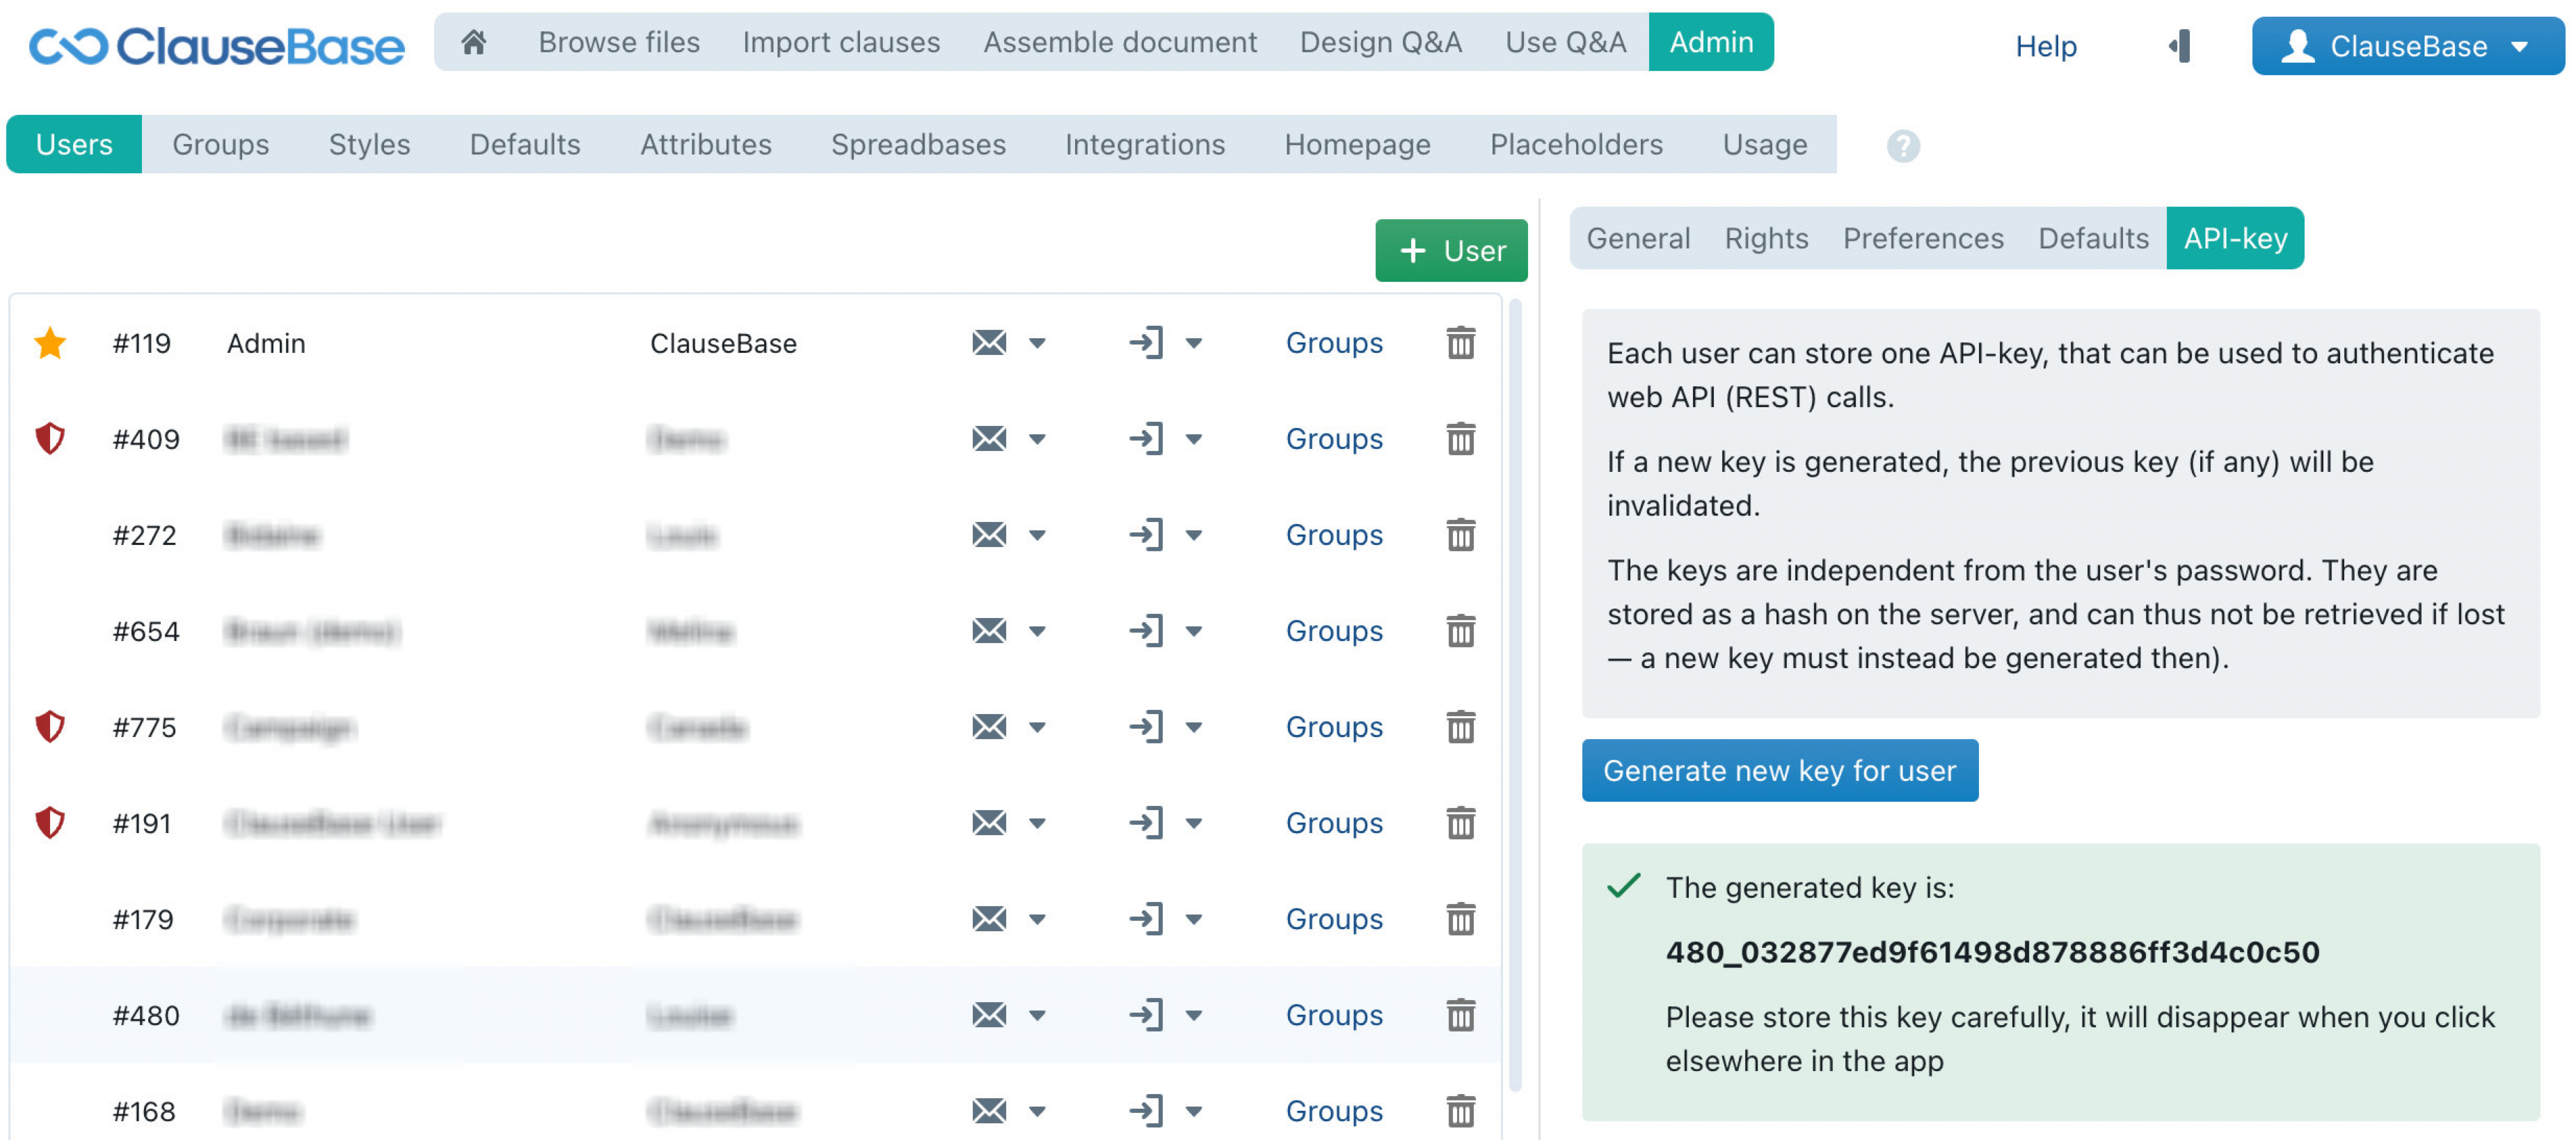
Only administrators can create API-keys, by going to the admin menu, subsection users, clicking on a specific user and then clicking on the API-key panel.
Introduction to the GraphQL API
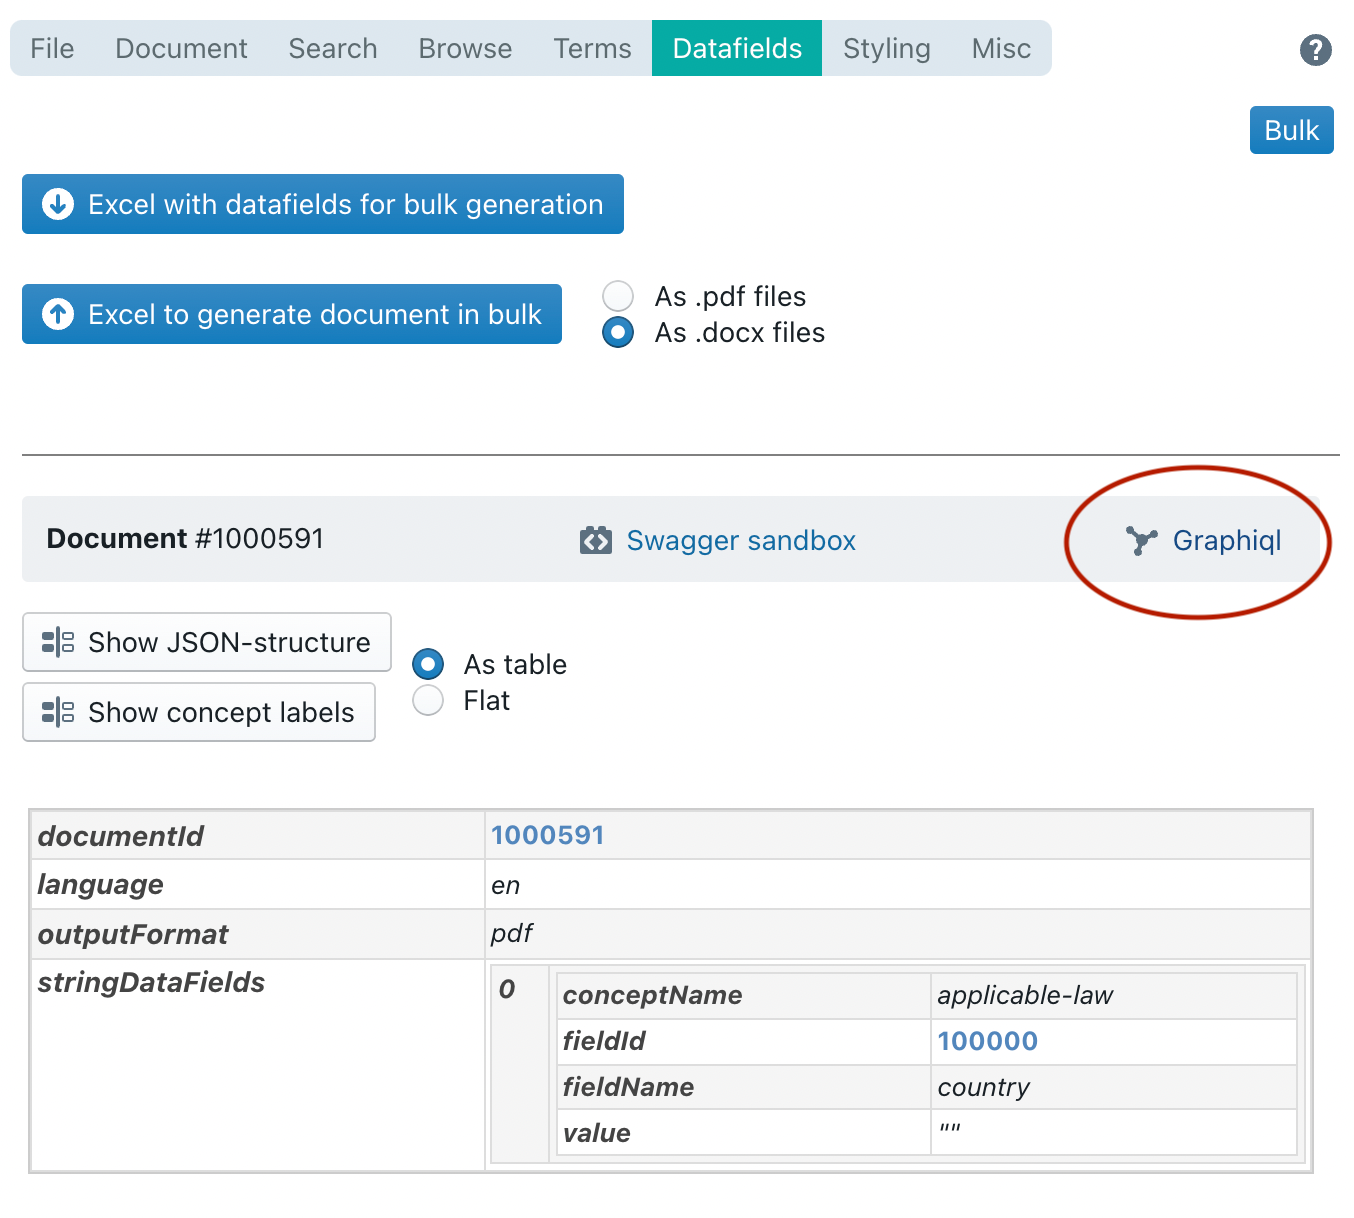
We offer a GraphQL implementation, together with a GraphiQL console that allows for interactive querying.
You can access the GraphiQL console by opening a document in Assemble Document mode, navigating to the Datafields tab and clicking on the GraphiQL link.
There is no need to provide a full explanation of how this API works, as you can interactively query the entire datamodel and querying capabilities through GraphiQL. By way of example, however, we provide a few samples below (all IDs are fictitious):
| Show all attribute models accessible to the user | { |
| Show the filename, body, title and attributes of clause 2000522. For the attributes, list the attribute model ID and (if it is a tag attribute model) the value | { |
| Show the ID and name of all the accessible paragraph stylings for the account | { |
| Show the ID and filename all clauses within the folder with Title clauses (2000541) | { |
| Search all clauses within the entire library (2000511) where tag “Liability” (ID 4) is equal to “Capped” | { |
| Show the ID and filename all clauses in the account that contain words “liability” and “software” | { |
| Render the clause with ID 2000533 (Applicable Law) as structured JSON | { |
| Render the clause with ID 2000533 (Applicable Law) as DOCX in Base64 | { |
| Get a list of all the datafields in clause with ID 2000533 (ID, the filename of the “concept” that hosts them, and name) | { |
| Build a document containing clauses Capped Liability (2000521), Applicable Law (2000533) and Software Insurance (2000525) below each other, in the default style | { |
| Build a document with the Schedule title (2000539), Schedule Subtitle (2000542), Section 1 title (2000543) and Introductory Clause (2000545), all as subclauses of each other. And then within Introductory Clause subclauses 1 (2000521) and 2 (2000522) | {build_document_docx(as_url: true, |
| Same as above, but with no indentation, no numbering and colored headings (= sample heading style scheme 2002) | {build_document_docx(as_url: true, styling_ids: [1002], |
Introduction to the REST API
The API of ClauseBase expects JSON as input (formatted in accordance with the Swagger 2.0 API).
Creating documents through the API
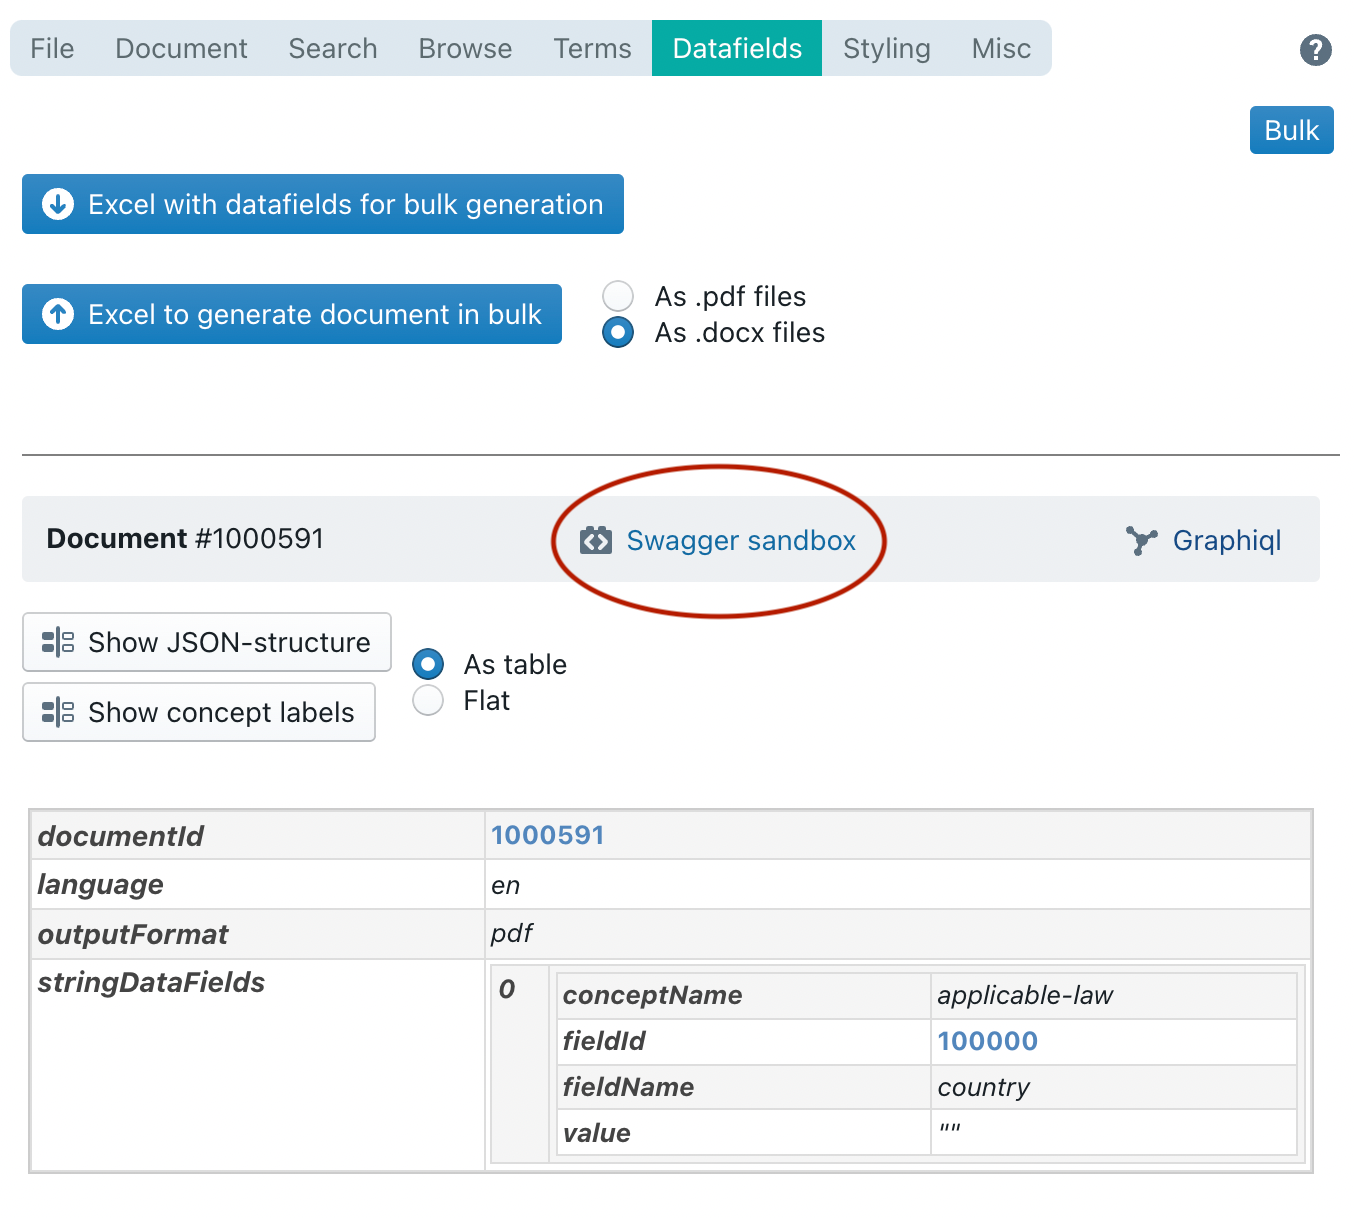
You can access the Swagger sandbox by opening a document in Assemble Document mode, navigating to the Datafields tab and clicking on the Swagger sandbox link.
In the remainder of this page, you can also access the “API Dashboard”.
Inspecting a Document’s structure
When sending an API-call, you need to specify the ID of the Document (or Binder). In addition, you can optionally specify:
- the language in which the Document should be generated: “en”, “nl” or “fr” (if not specified, English will be used)
- the document-type (.docx, .html or .pdf — if not specified, .docx will be used)
- the contents of all relevant datafields
- a list of styling-IDs to change the overall formatting of the Document (if not specified, the user’s default stylings will be used)
- a list of concept-labels, to change the terminology used in a Document.
ClauseBase provides various facilities to help you find the relevant data for your API-call.
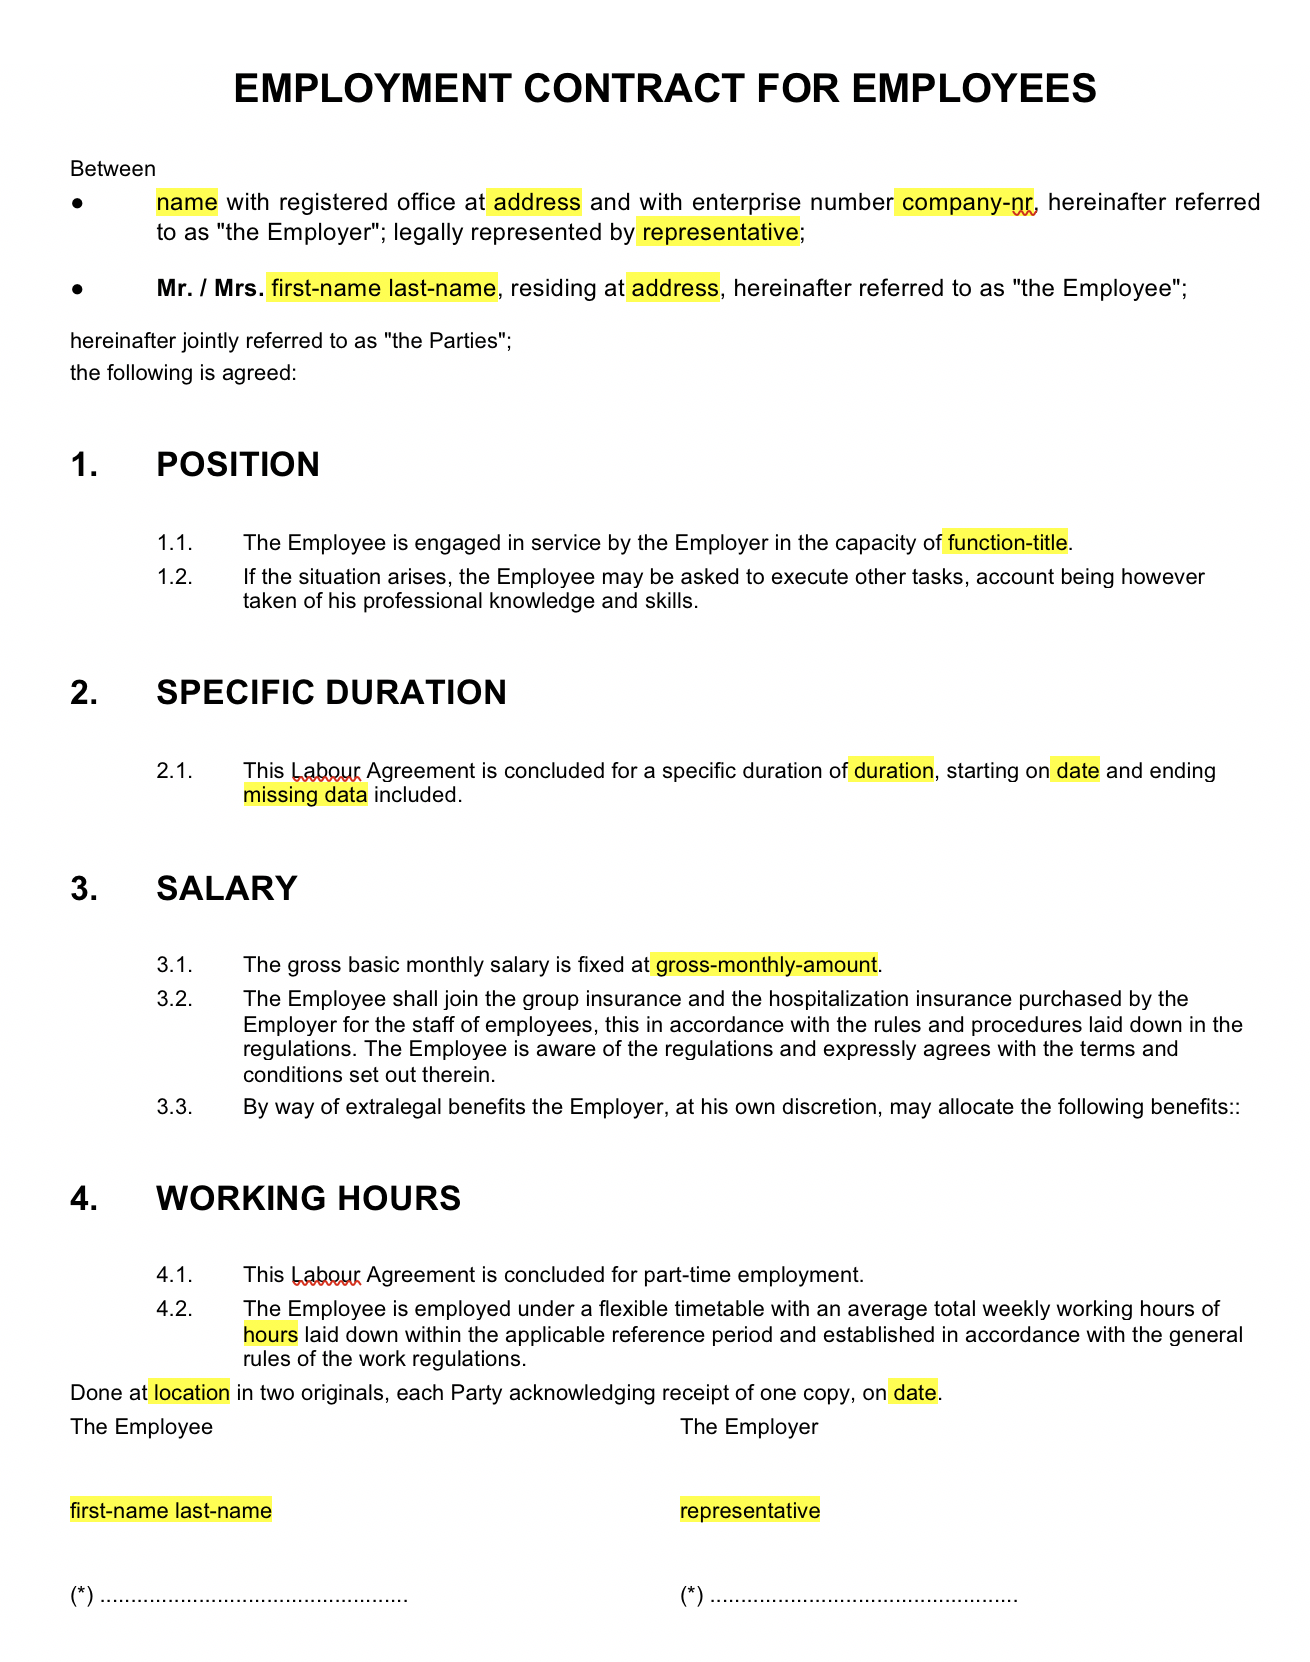
For example, assume that we want to issue API-calls to generate files on the basis of the following demo document:
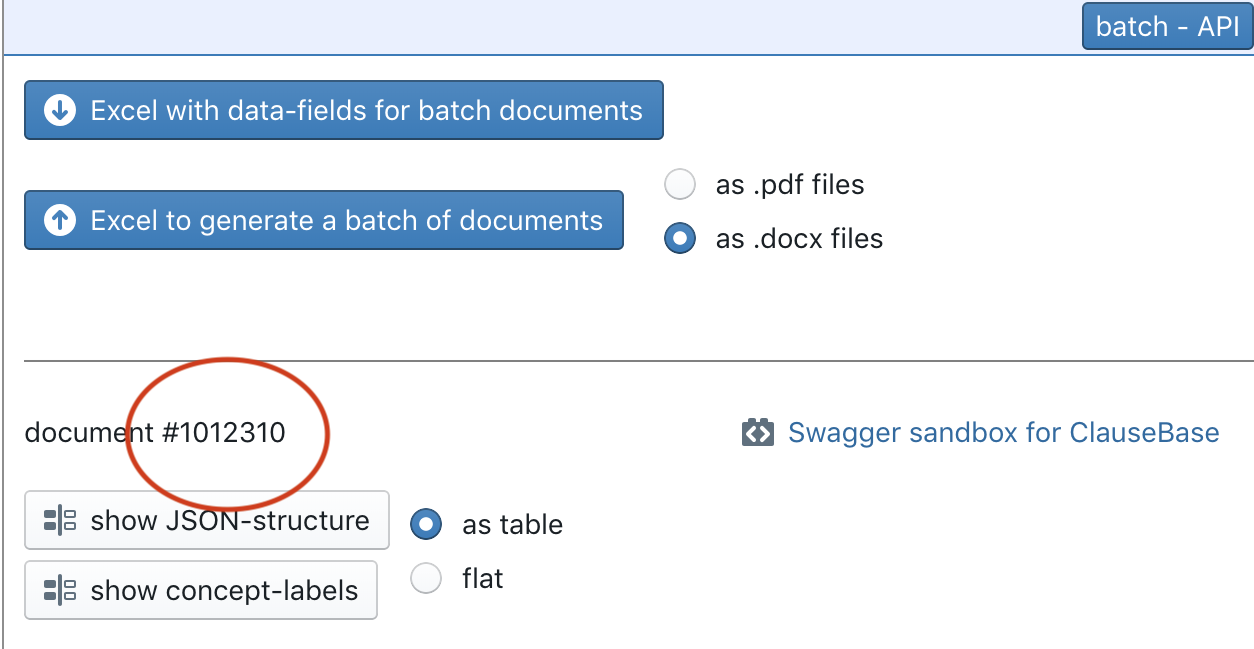
Finding the Document ID
The ID of the Document (or Binder) is shown at the top of the API Dahsboard. In the example below, the ID is 1012310.
In addition, you can use the all_documents_in_account API-call (discussed below) to find the ID of all documents in your account.
Finding the datafields and their IDs
Documents will differ in the datafields they use. To retrieve an exhaustive list of all datafields used in a specific document, you can click on the “show JSON-structure” button in the API Dashboard.
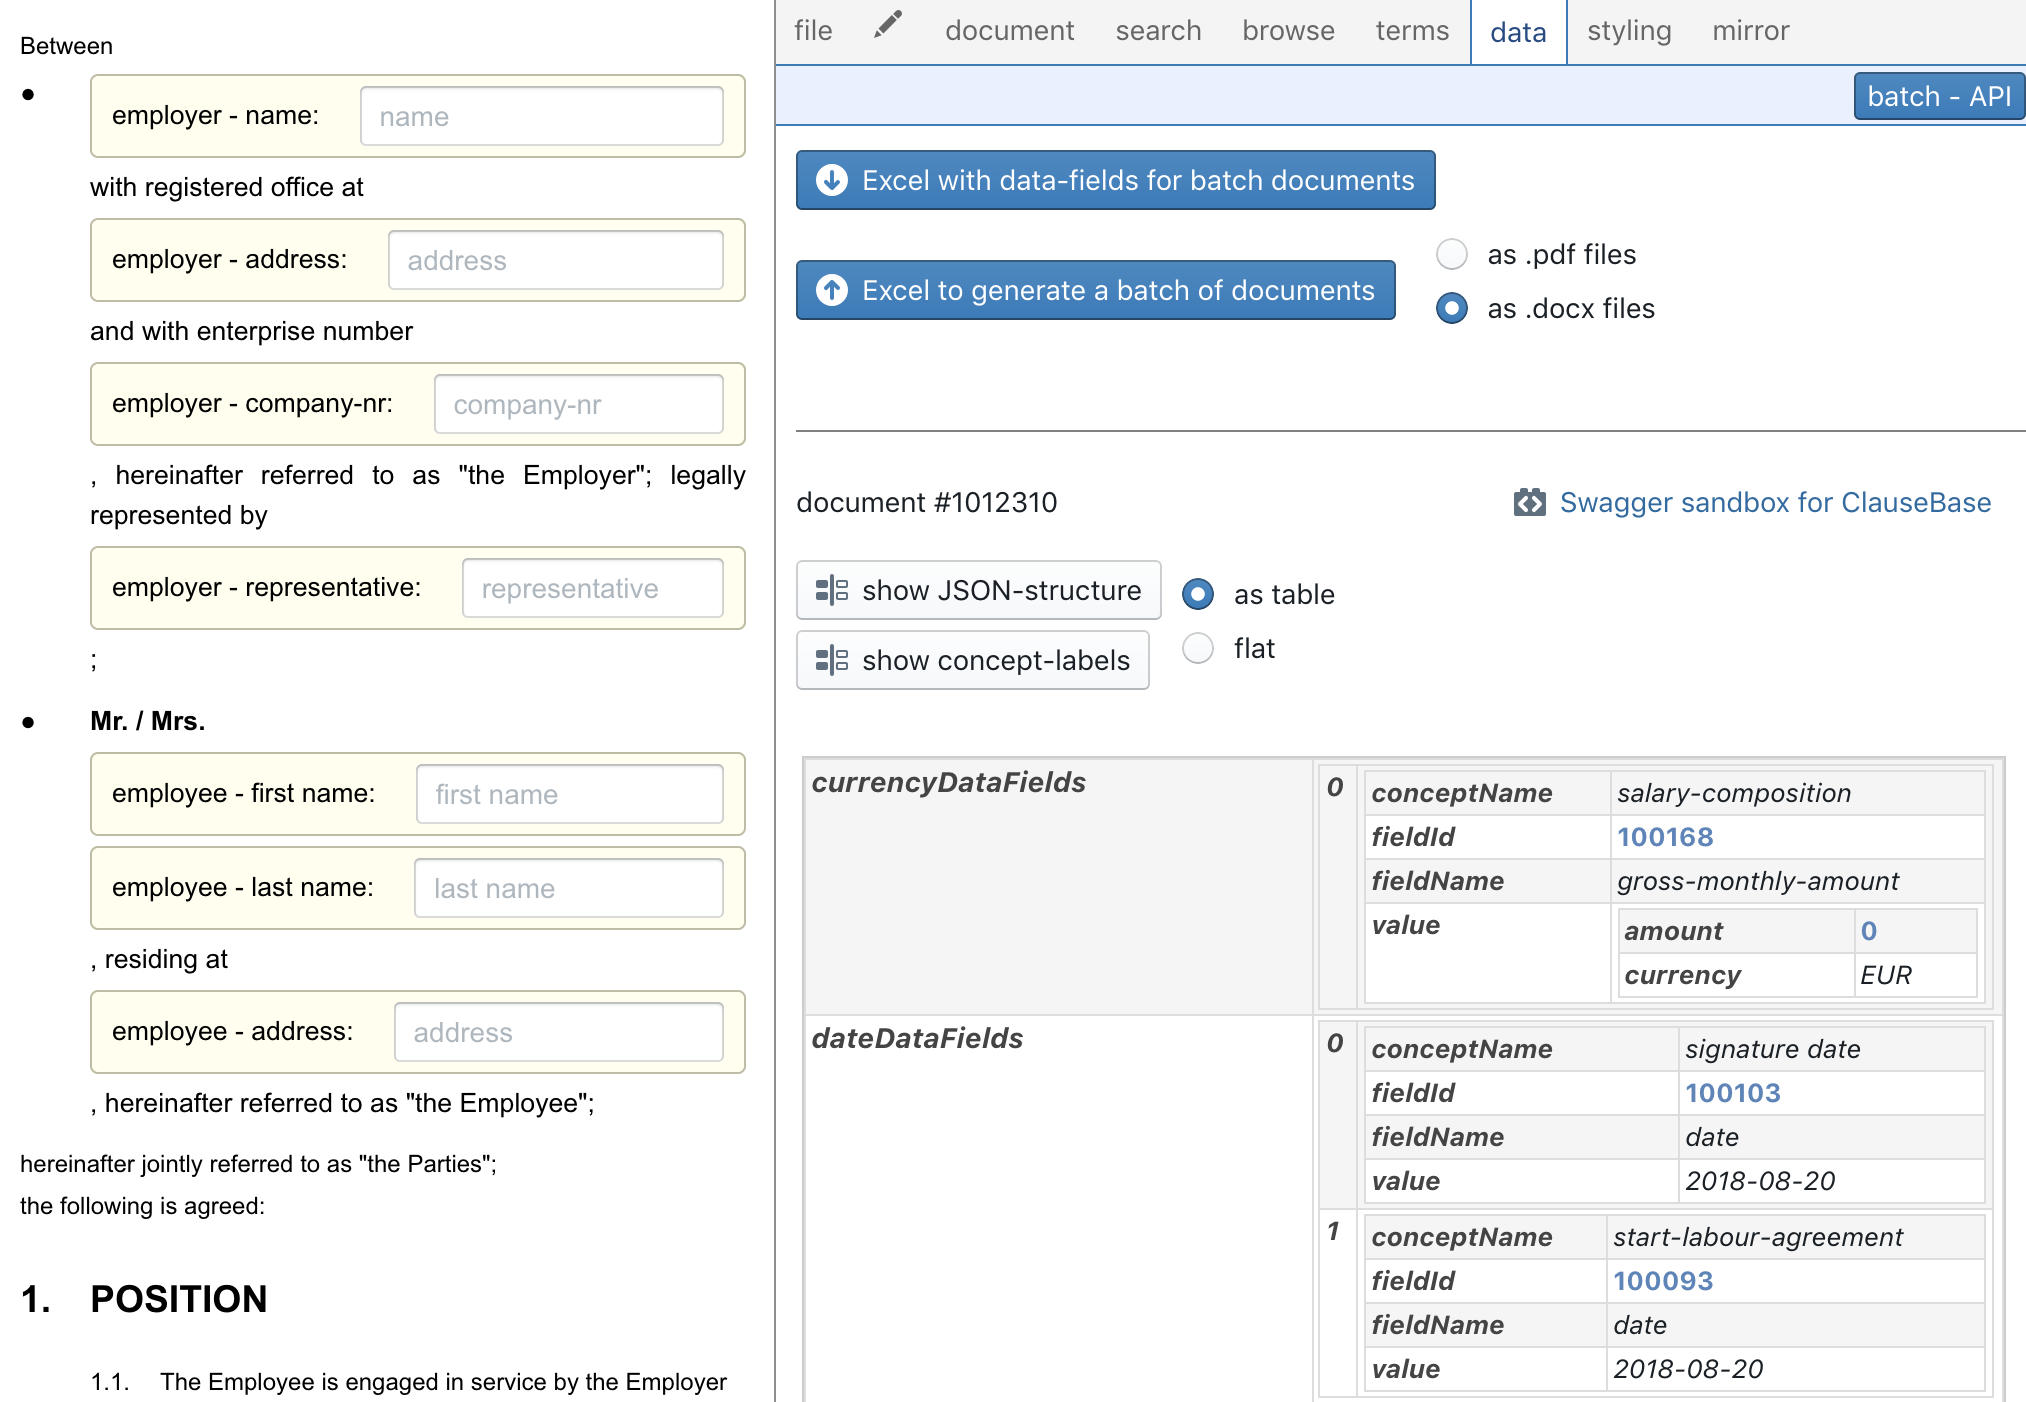
All the datafields will be grouped according to their type: integers, floats, currencies, strings, string-lists, dates and durations. In addition, there is a special datafield type (“repeating lists”) that can contain a heterogeneous list of elements, typically used to fill table columns. Unfortunately, the industry-standard Swagger 2.0 API used by ClauseBase does not support heterogenous arrays, so you will have to subdivide these yourself. More on that below.
Another possibility to find all the datafields and their IDs, is to inspect the Data Dashboard (click on the “batch-API” button to toggle between the regular Data Dashboard and the API-related content). If you hover your mouse over the name of a datafield, its ID will be shown in a small popup-window.
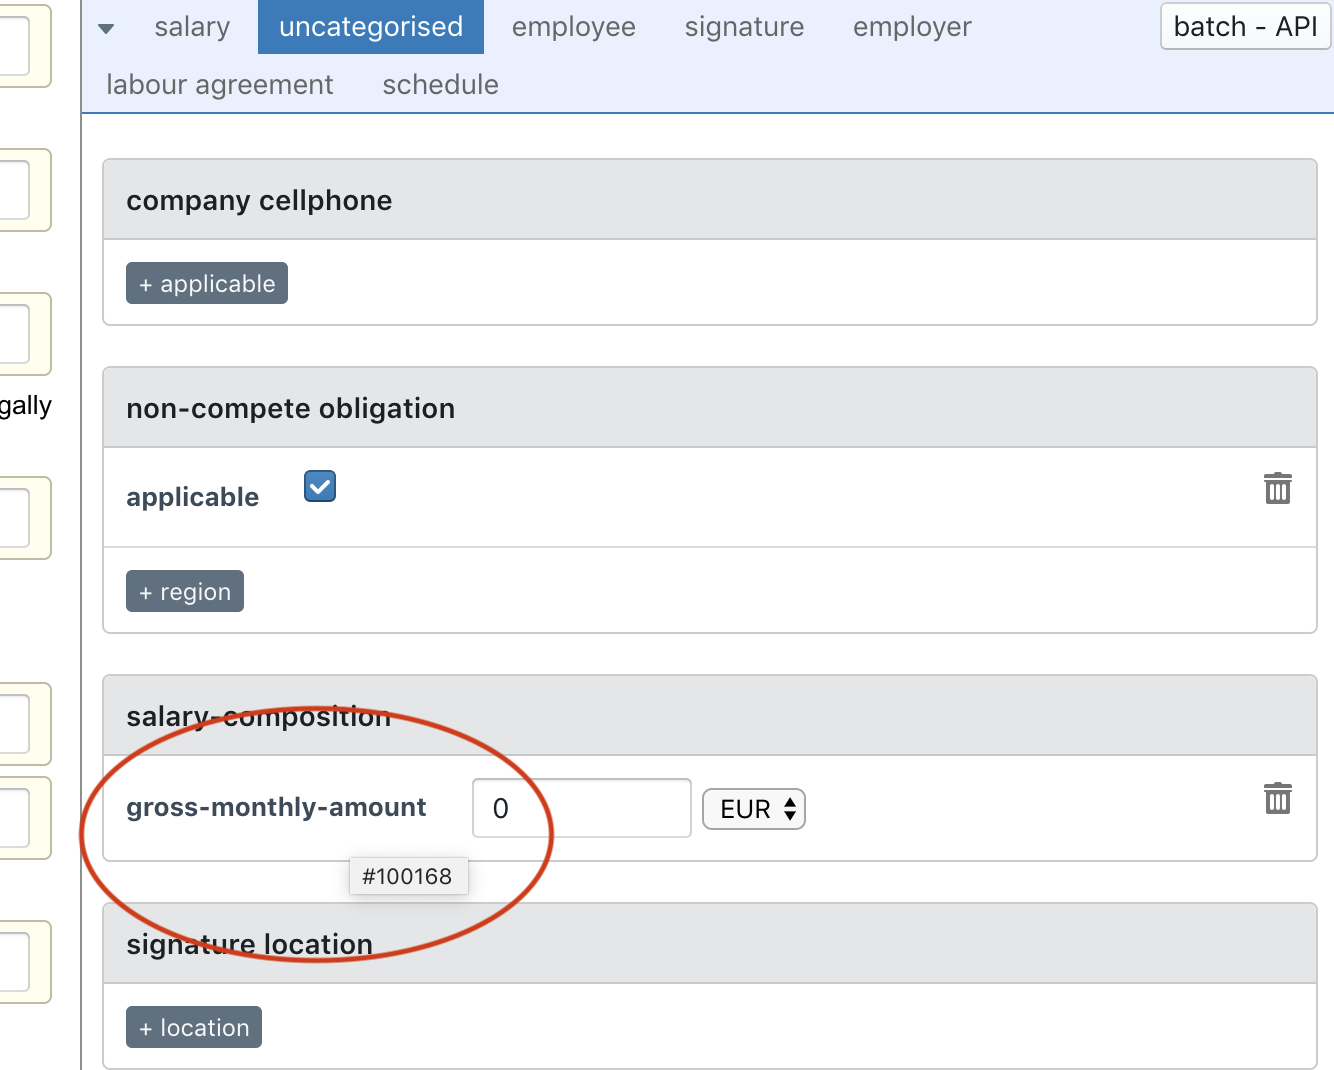
Be aware that — unlike the exhaustive table shown in the API Dashboard — the Data Dashboard only shows datafields that are currently in use. If, for example, a certain datafield is only used in a specific paragraph, and that paragraph happens to be hidden (e.g., because its conditions are not met), then the datafield in question will not show up in the Data Dashboard.
In addition, you can use the datafields_in_document API-call (discussed below) to find the IDs and types of datafields in a document.
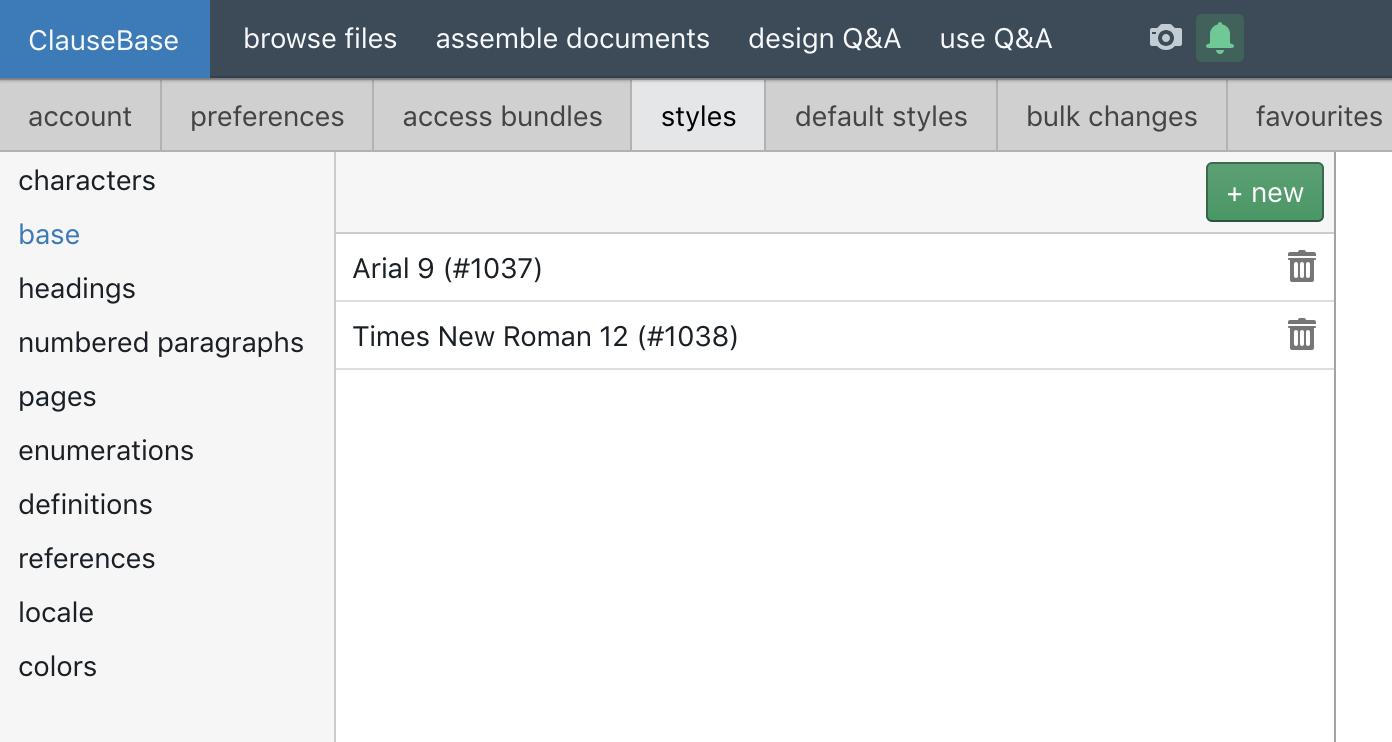
Finding the Style IDs
The IDs of the styles that you may want to optionally apply, can be retrieved by going to your personal styles preferences (button at the top right > styles).
In the example below, style numbers 1037 and 1038 are available to change the base font and spacing. Similarly, you can use a specific style ID to change the page-related styling, the heading-related styling, etc.
In addition, you can use the all_styles_in_account API-call (further discussed below) to find the IDs, types and names of all styles available in your account.
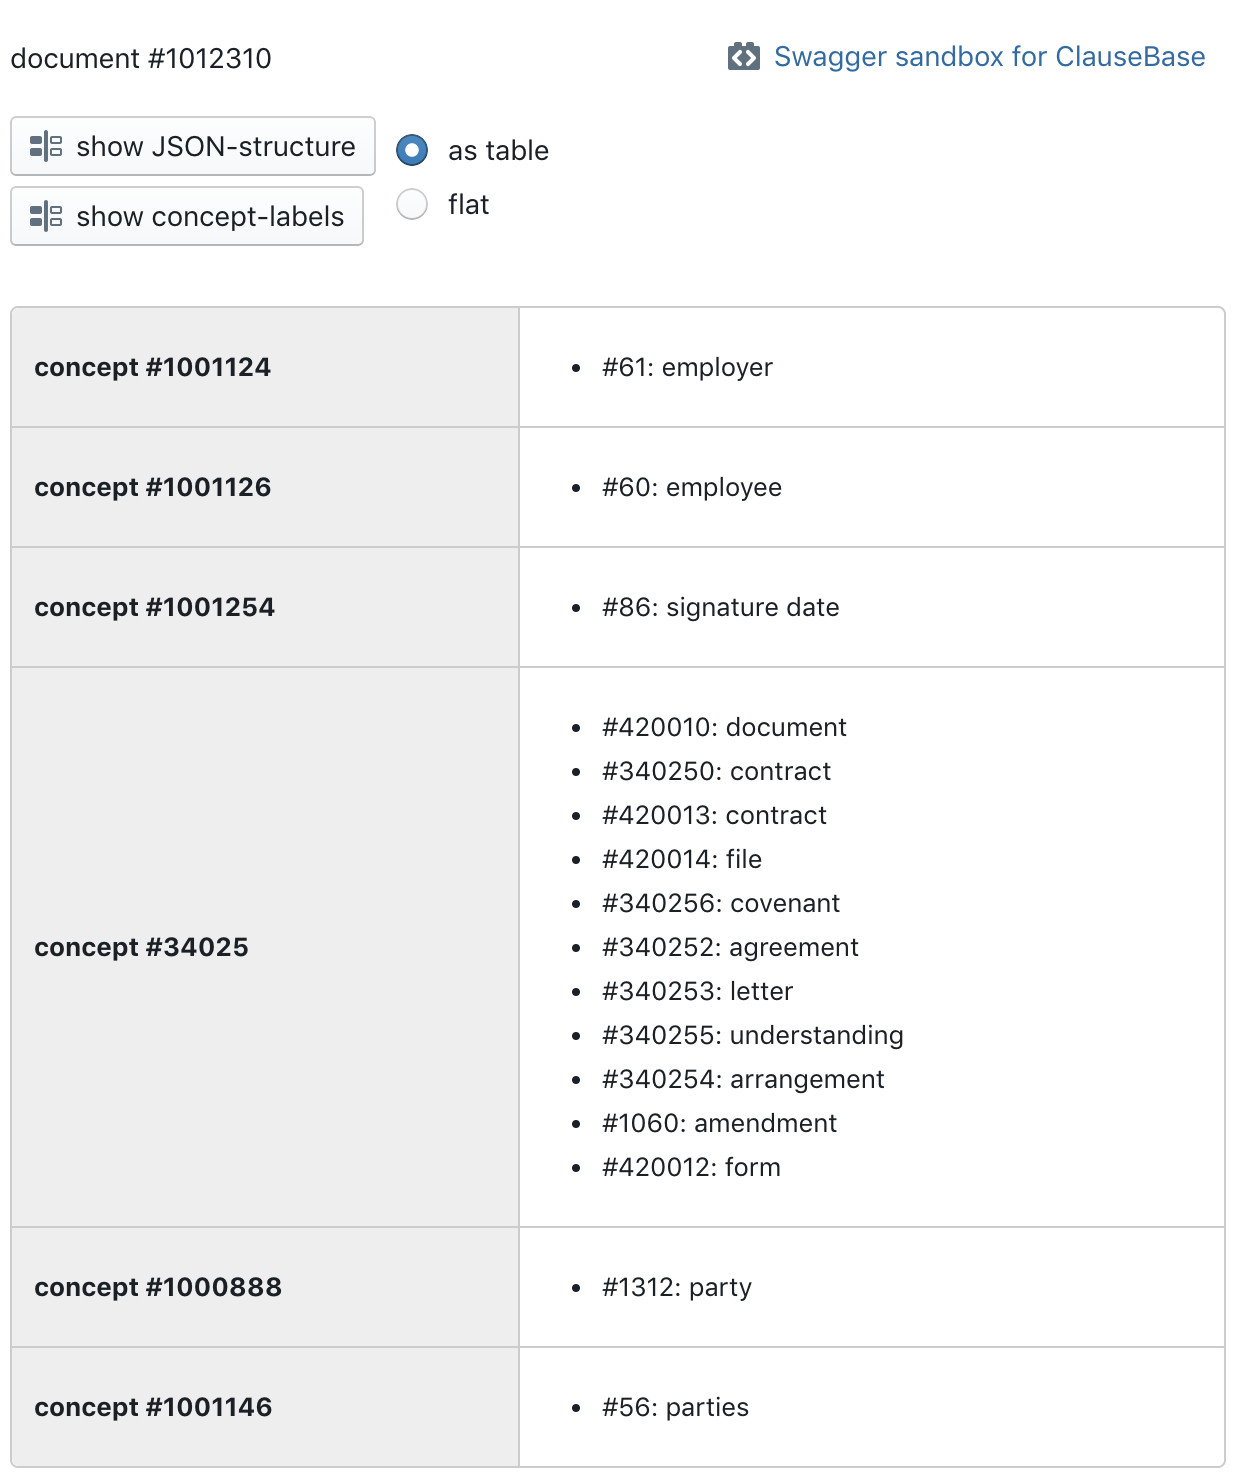
Finding concept-labels and their IDs
In the API Dashboard, you can click on the “show concept-labels” button to get an exhaustive overview of all the concepts used in the current Document, together with all the IDs of standard concept-labels.
In addition, you can use the conceptlabels_in_document API-call (further discussed below) to find the concepts used in a specific Document.
JSON content
When you click on the “show JSON-structure” button, and use the flat option (instead of the “as table” option), you will be presented with a text box containing sample JSON. This JSON can be used as a starting point to experiment with the API.
The labour agreement sample we used above, will for example resulting in the following JSON-object:
{
  "documentId": 1012310,
  "outputFormat": "pdf",
  "language": "en",
  "currencyDataFields": [
    {
      "conceptName": "salary-composition",
      "fieldId": 100168,
      "fieldName": "gross-monthly-amount",
      "value": {
        "amount": 0,
        "currency": "EUR"
      }
    }
  ],
  "stringDataFields": [
    {
      "conceptName": "employee",
      "fieldId": 100071,
      "fieldName": "address",
      "value": ""
    },
    {
      "conceptName": "employee",
      "fieldId": 100076,
      "fieldName": "first-name",
      "value": ""
    },
    {
      "conceptName": "employee",
      "fieldId": 100154,
      "fieldName": "function-title",
      "value": ""
    },
    {
      "conceptName": "employee",
      "fieldId": 100072,
      "fieldName": "gender",
      "value": ""
    },
    {
      "conceptName": "employee",
      "fieldId": 100077,
      "fieldName": "last-name",
      "value": ""
    },
    {
      "conceptName": "employee category",
      "fieldId": 100140,
      "fieldName": "type",
      "value": ""
    },
    {
      "conceptName": "employer",
      "fieldId": 100073,
      "fieldName": "address",
      "value": ""
    },
    {
      "conceptName": "employer",
      "fieldId": 100116,
      "fieldName": "company-nr",
      "value": ""
    },
    {
      "conceptName": "employer",
      "fieldId": 100075,
      "fieldName": "name",
      "value": ""
    },
    {
      "conceptName": "employer",
      "fieldId": 100074,
      "fieldName": "representative",
      "value": ""
    },
    {
      "conceptName": "employer",
      "fieldId": 100115,
      "fieldName": "representative-function",
      "value": ""
    },
    {
      "conceptName": "signature location",
      "fieldId": 100104,
      "fieldName": "location",
      "value": ""
    }
  ],
  "stringListDataFields": [
    {
      "conceptName": "other-salary-components",
      "fieldId": 100165,
      "fieldName": "descriptions",
      "value": [
        ""
      ]
    }
  ],
  "dateDataFields": [
    {
      "conceptName": "signature date",
      "fieldId": 100103,
      "fieldName": "date",
      "value": "2018-08-20"
    },
    {
      "conceptName": "start-labour-agreement",
      "fieldId": 100093,
      "fieldName": "date",
      "value": "2018-08-20"
    }
  ],
  "durationDataFields": [
    {
      "conceptName": "labour-agreement",
      "fieldId": 100156,
      "fieldName": "duration",
      "value": ""
    }
  ]
}
A few things to note about this JSON content:
- Within ClauseBase, datafields of type “repeating list” (typically used to populate columns of tables) can be heterogeneous, i.e. a mix of element-types (e.g., a single list may contain a date, two strings, and three floats). Unfortunately, the Swagger 2.0 API does not support such mix of element-types, so you will have to subdivide such fields yourself into homogenous lists of one of the following types:
- repeatingIntegerDataFields
- repeatingFloatDataFields
- repeatingCurrencyDataFields
- repeatingStringDataFields
- repeatingDateDataFields
- repeatingDurationDataFields
- repeatingBooleanDataFields
- The “fieldName” and “conceptName” fields will be ignored by ClauseBase — they are purely for your own internal documentation purposes.
- The sample JSON does not contain any placeholder for the optional styles. If you want to apply specific styles to the Document, then you will have to click the “show concept-labels” button, and merge the JSON objects with the resulting conceptLabels JSON-object.
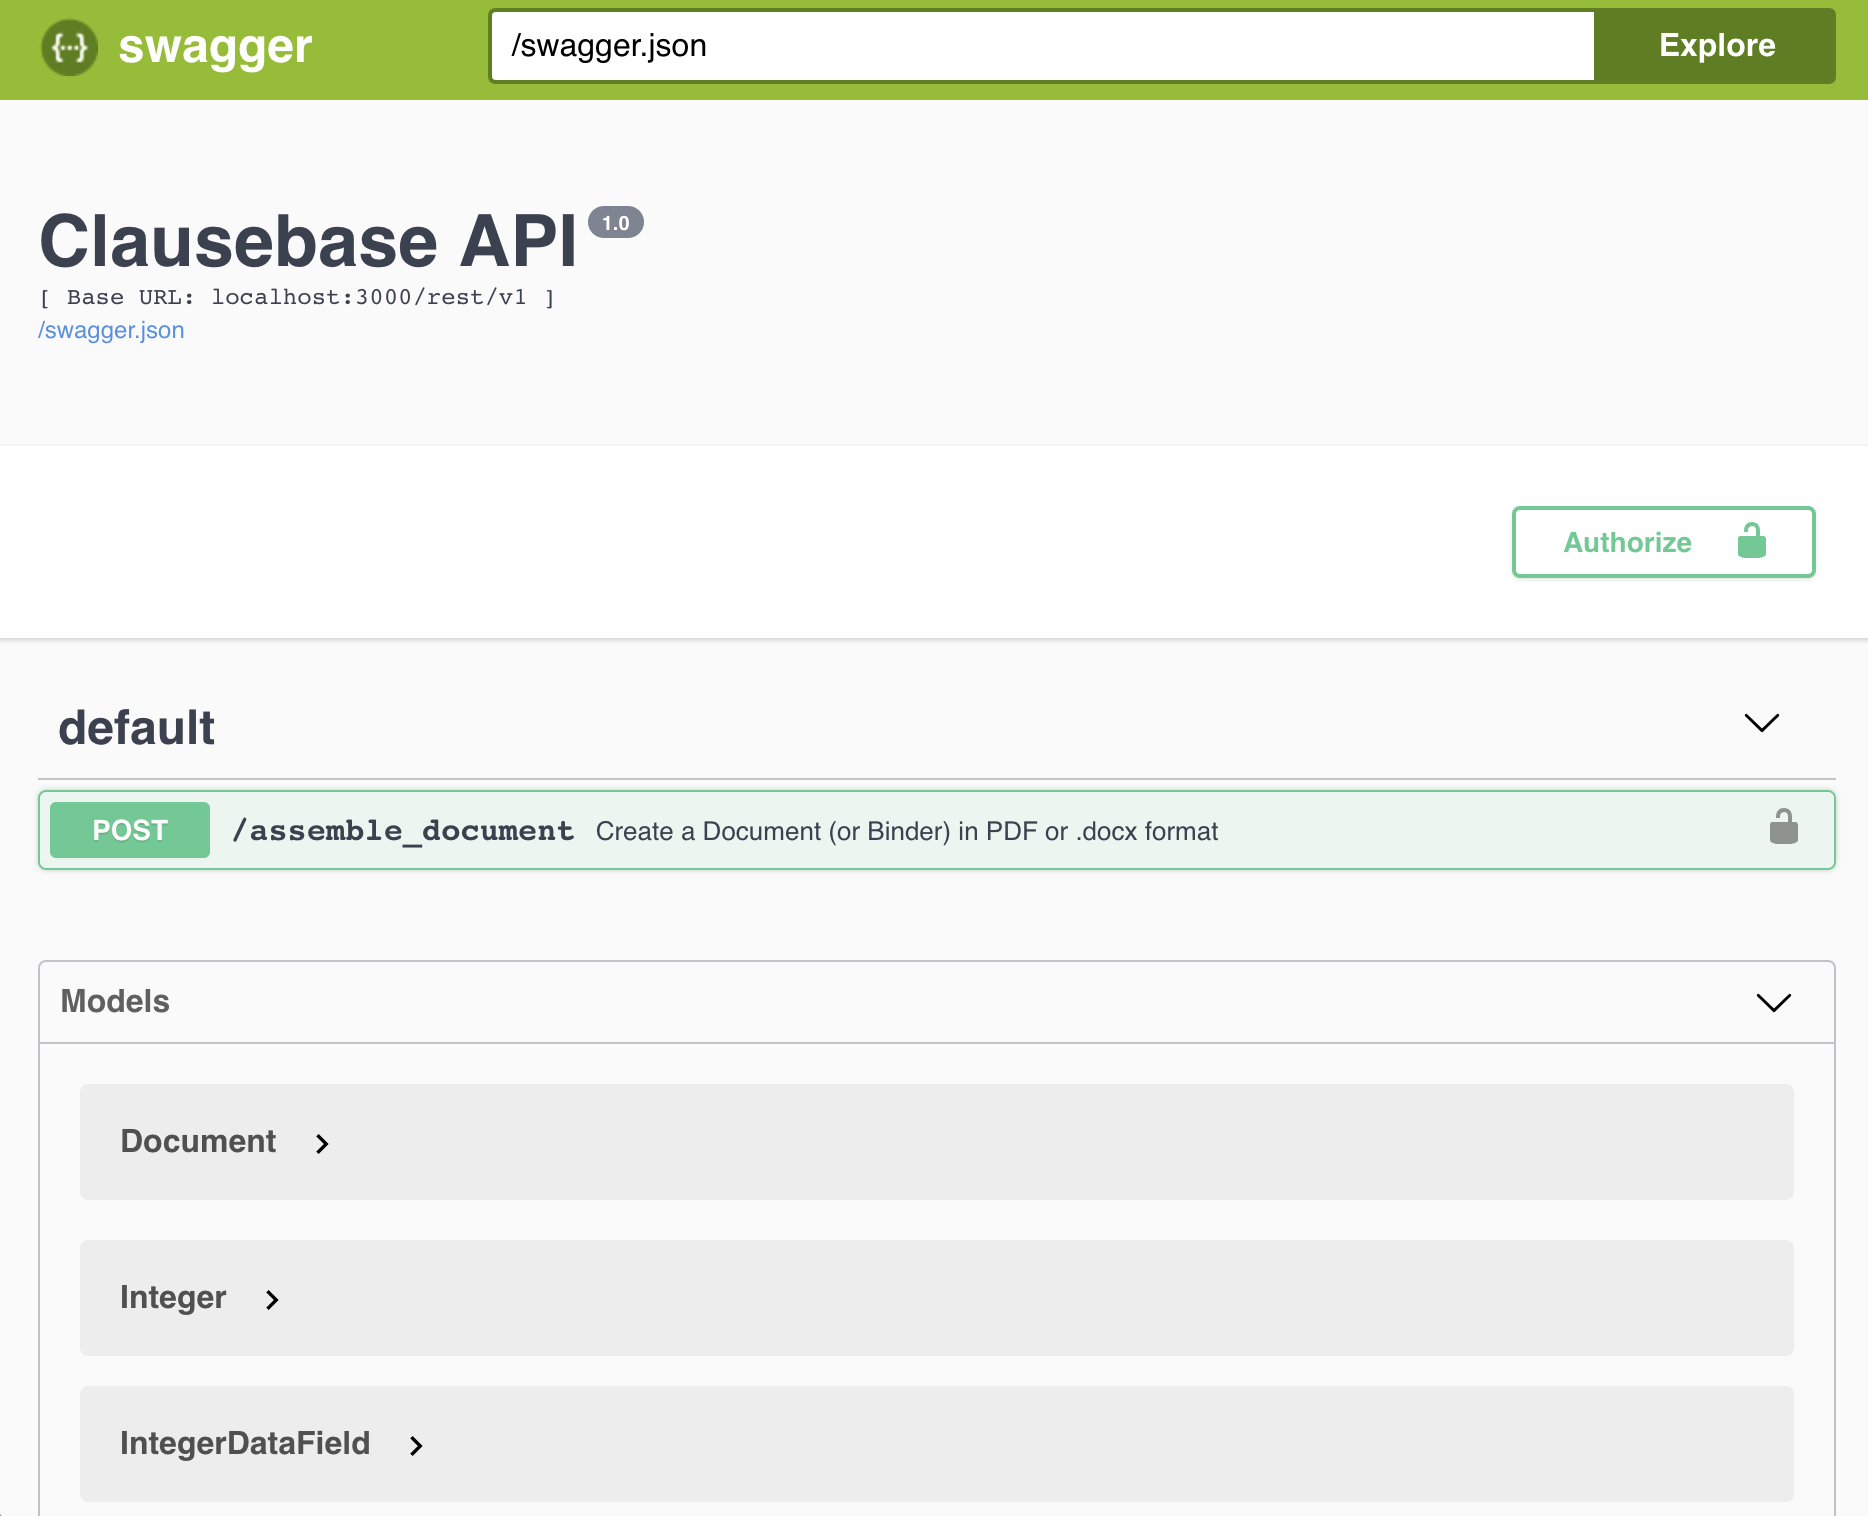
Using the Swagger sandbox
You can experiment with the API by clicking on the “Swagger sandbox for ClauseBase” button of the API Dashboard, or by entering the URL directly by adding /swagger/index.html to the relevant subdomain (e.g. https://app.clausebase.com/swagger/index.html for the Belgian version). A new browser window or browser tab will then be opened, showing the standard Swagger interface.
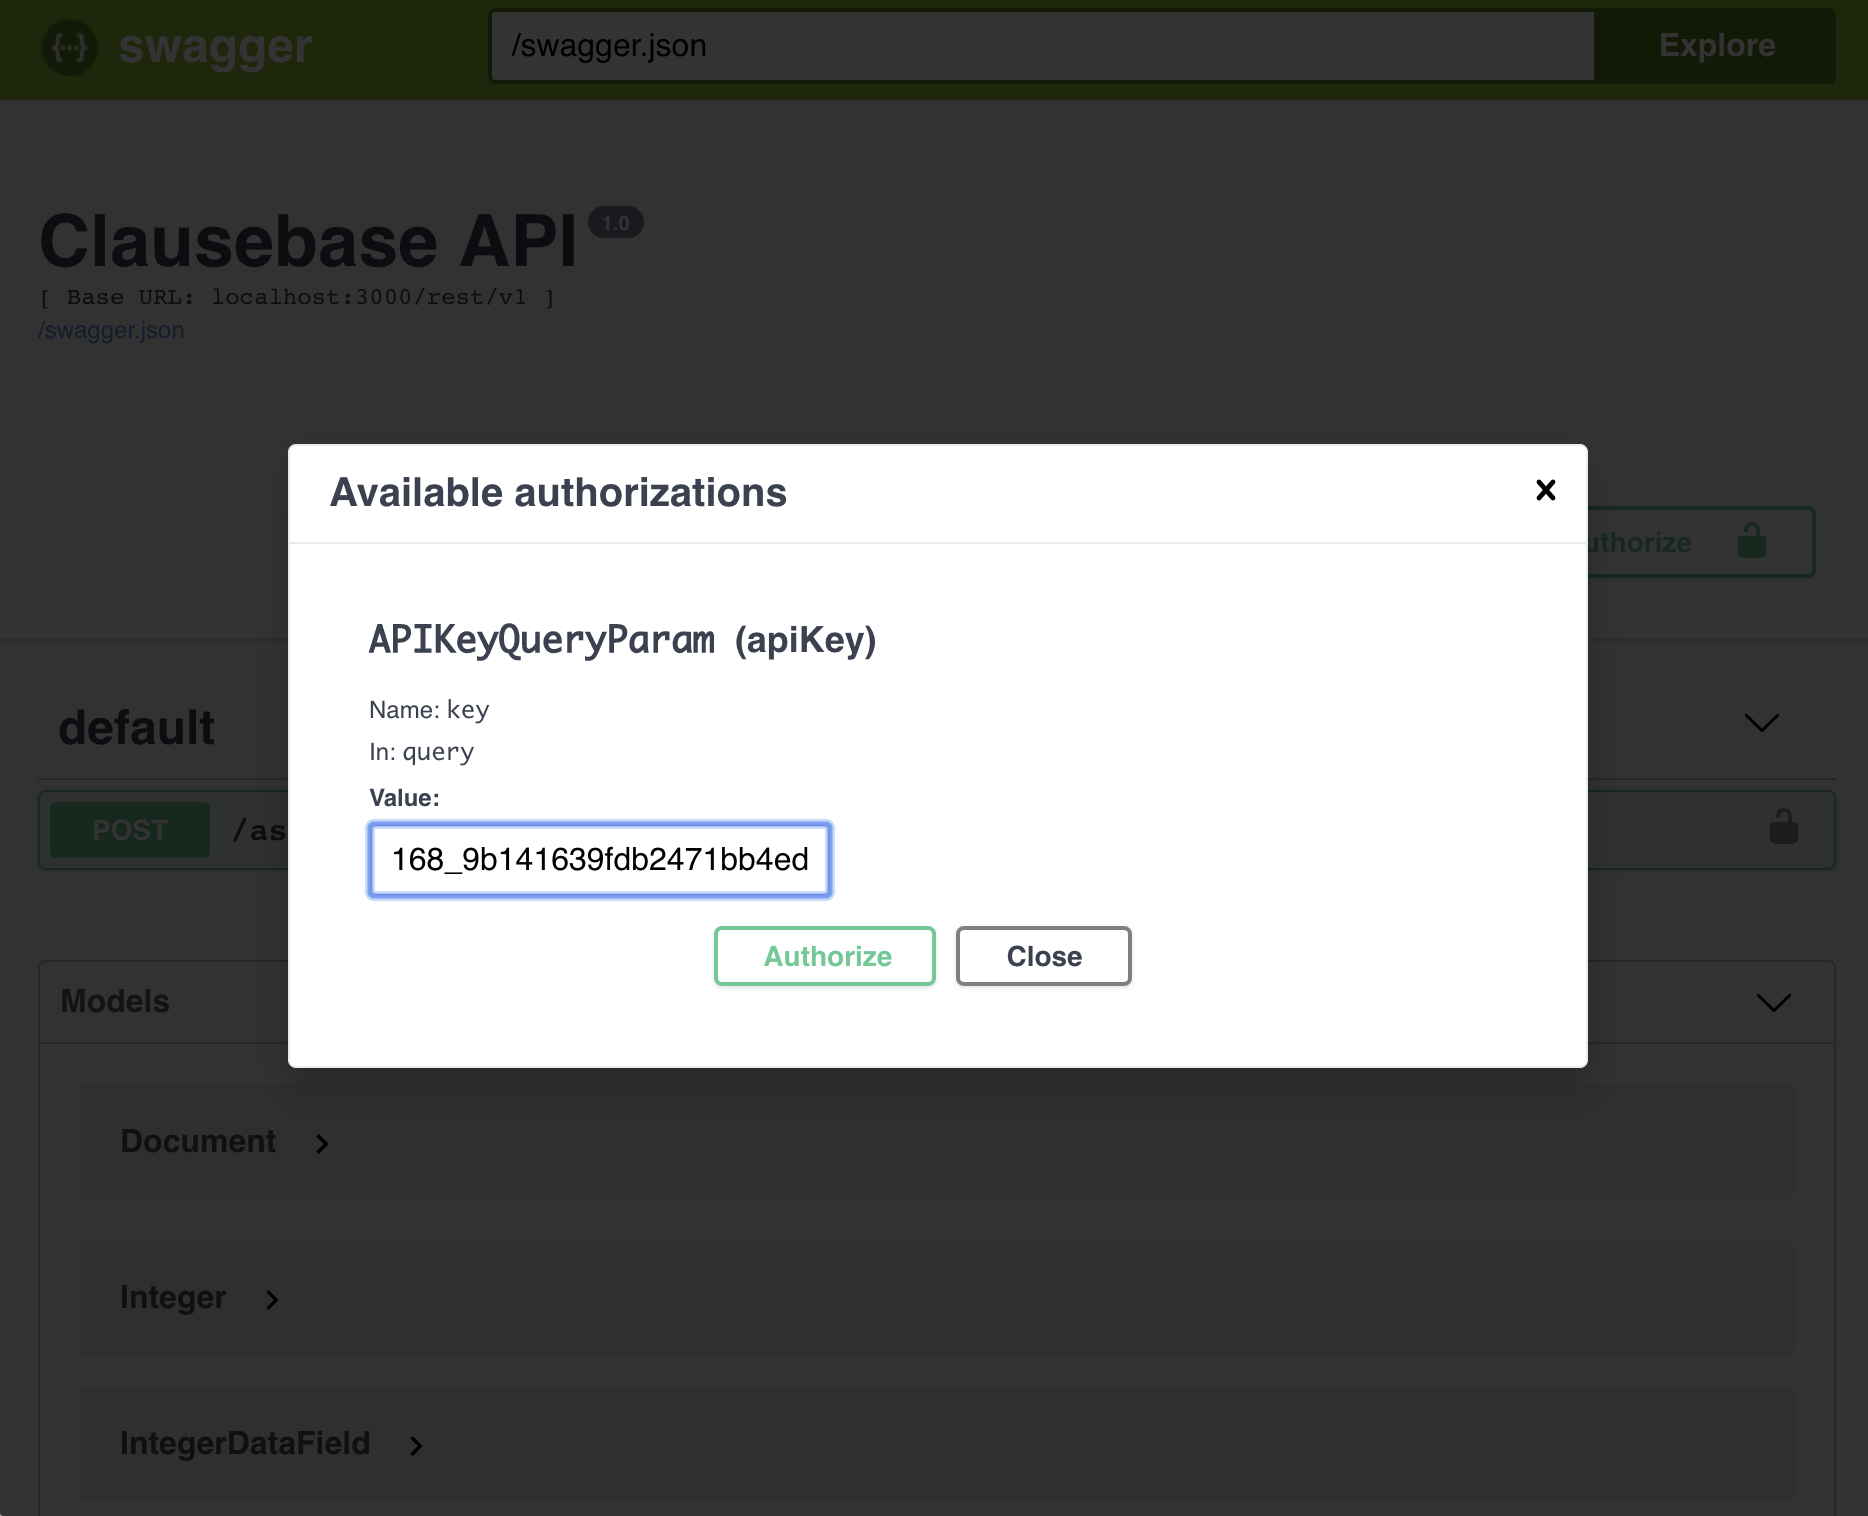
In order to try some API calls, you will first have to click on the Authorize button, and enter your private API key.
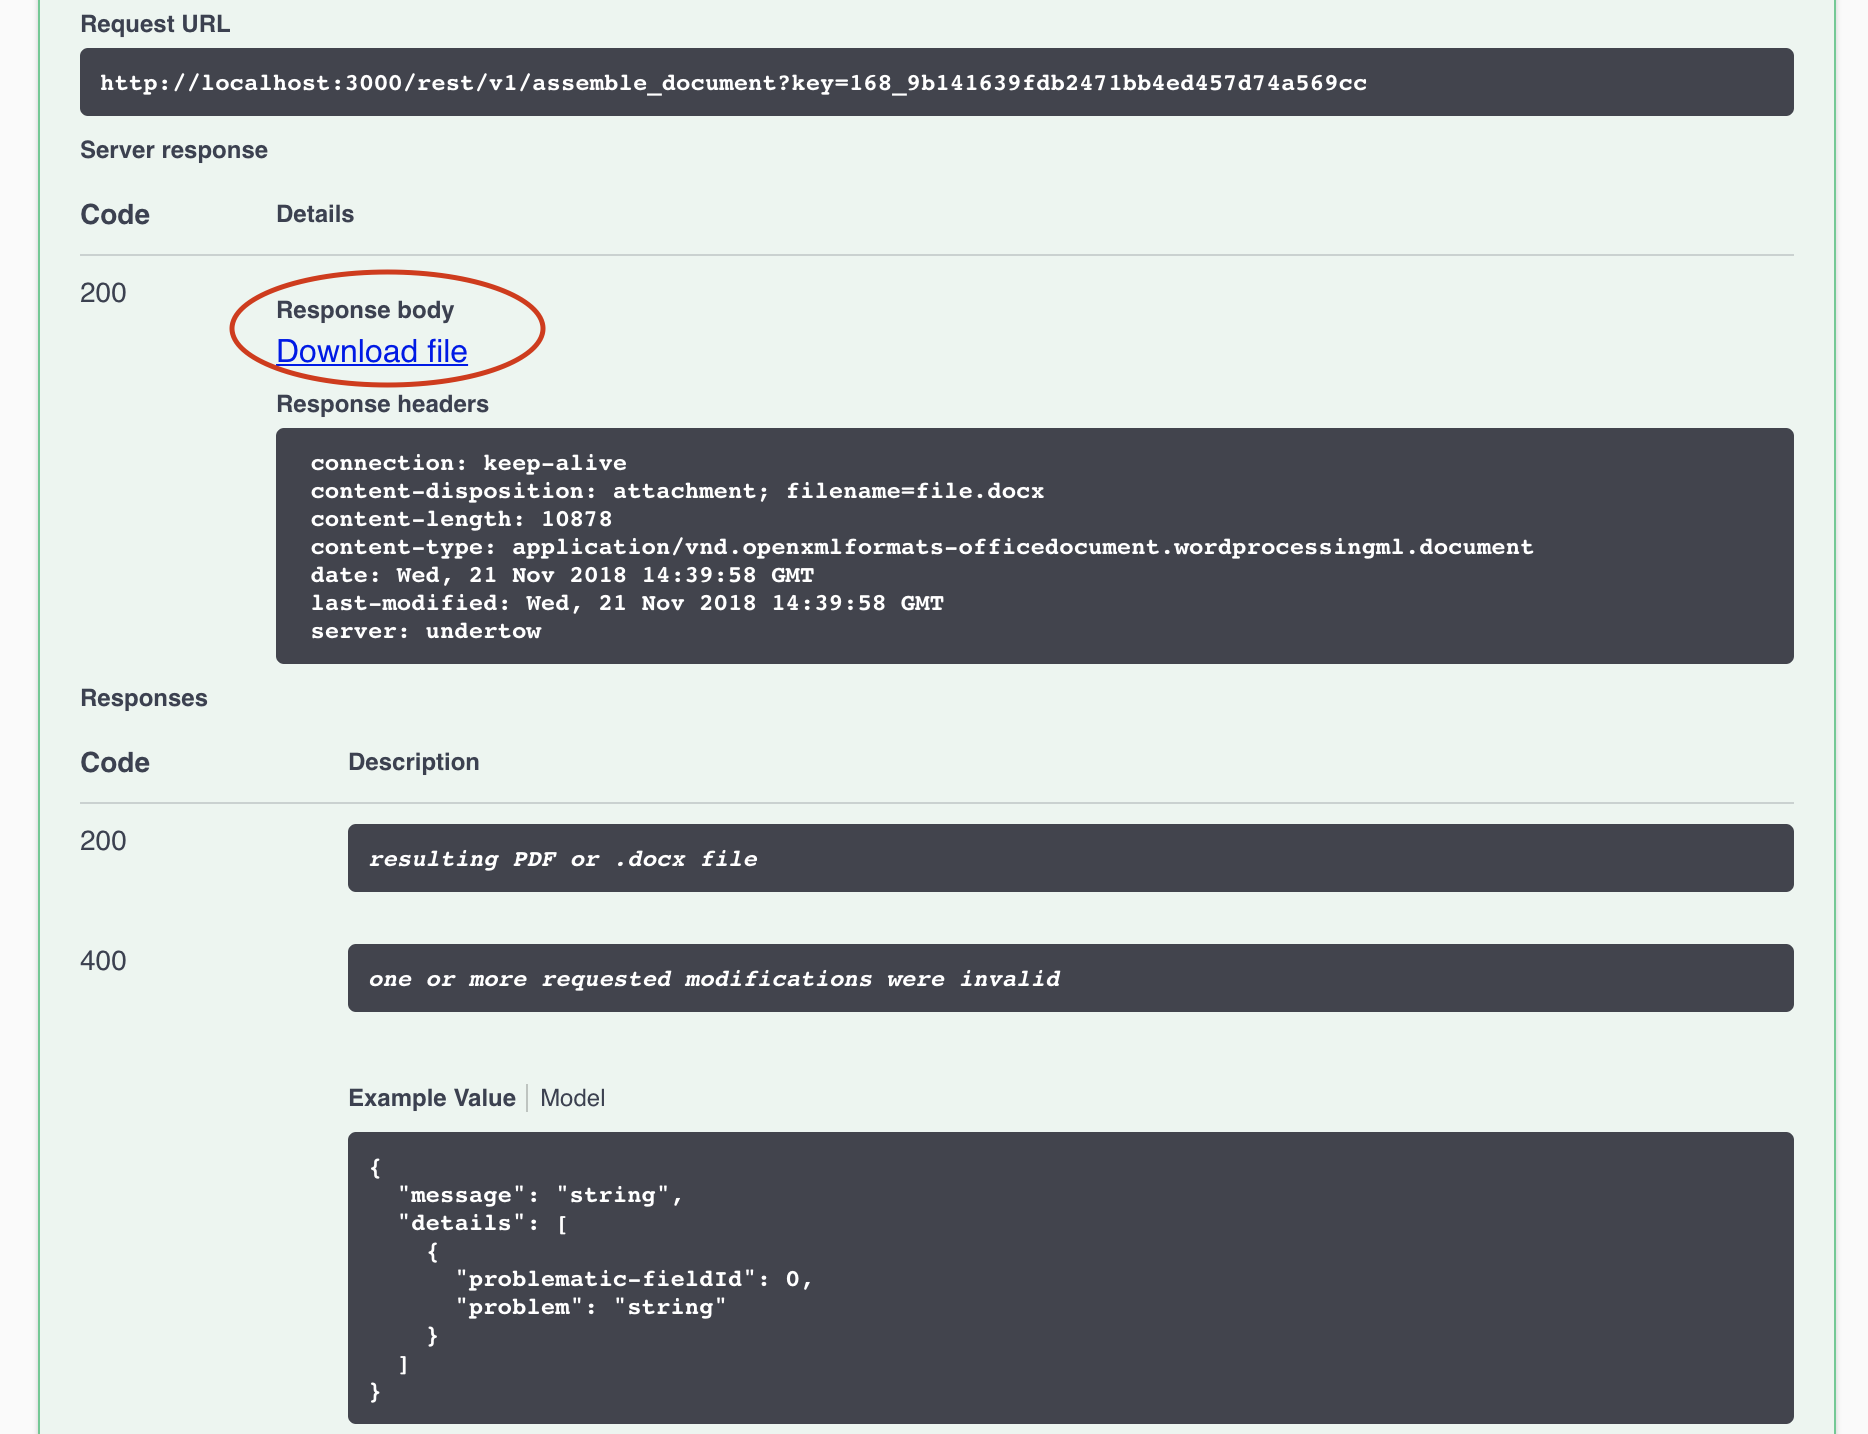
Next, you have to click on the green POST button, and then the “Try it out” button.
You will then be presented with several boxes. The most important one is the body box, where you should paste your JSON-object. Finally, you should hit the Execute-button. If successful, you can then download the resulting file.
In the bottom of the sandbox, you can also drill-down on the datafields to get more details about the allowed, required and optional values.
Some JSON-samples
{
  "documentId": 1012310,
  "outputFormat": "docx"
}
{
  "documentId": 1012310,
  "outputFormat": "pdf"
}
With additional styling
Styling with ID 1038 results in a base font of Times New Roman, while the styling with ID 1039 refers to a page styling that contains a header, footer and deviating title font.
{
  "documentId": 1012310,
  "outputFormat": "pdf",
  "styles": [1038, 1039]
}
All fields filled-in
As explained above, it is not necessary to include the “fieldName” and “conceptName” fields. (We only include them here for demonstration/documentation purposes.)
{
  "documentId": 1012310,
  "outputFormat": "pdf",
  "language": "en",
  "currencyDataFields": [
    {
      "conceptName": "salary-composition",
      "fieldId": 100168,
      "fieldName": "gross-monthly-amount",
      "value": {        "amount": 2315,        "currency": "EUR"      }
    }
  ],
  "stringDataFields": [
    {
      "conceptName": "employee",
      "fieldId": 100071,
      "fieldName": "address",
      "value": "Main Street 35, 1000 Brussels"
    },
    {
      "conceptName": "employee",
      "fieldId": 100076,
      "fieldName": "first-name",
      "value": "Jane"
    },
    {
      "conceptName": "employee",
      "fieldId": 100154,
      "fieldName": "function-title",
      "value": "Sales Manager"
    },
    {
      "conceptName": "employee",
      "fieldId": 100072,
      "fieldName": "gender",
      "value": "female"
    },
    {
      "conceptName": "employee",
      "fieldId": 100077,
      "fieldName": "last-name",
      "value": "Smith"
    },
    {
      "conceptName": "employee category",
      "fieldId": 100140,
      "fieldName": "type",
      "value": "sales representative"
    },
    {
      "conceptName": "employer",
      "fieldId": 100073,
      "fieldName": "address",
      "value": "Square Street 58, 2000 Antwerp"
    },
    {
      "conceptName": "employer",
      "fieldId": 100116,
      "fieldName": "company-nr",
      "value": "BE123456789"
    },
    {
      "conceptName": "employer",
      "fieldId": 100075,
      "fieldName": "name",
      "value": "Acme Inc"
    },
    {
      "conceptName": "employer",
      "fieldId": 100074,
      "fieldName": "representative",
      "value": "John Johnson"
    },
    {
      "conceptName": "employer",
      "fieldId": 100115,
      "fieldName": "representative-function",
      "value": "CEO"
    },
    {
      "conceptName": "signature location",
      "fieldId": 100104,
      "fieldName": "location",
      "value": "2000 Antwerp"
    }
  ],
  "stringListDataFields": [
    {
      "conceptName": "other-salary-components",
      "fieldId": 100165,
      "fieldName": "descriptions",
      "value": ["company car", "extra-legal benefits"]
    }
  ],
  "dateDataFields": [
    {
      "conceptName": "signature date",
      "fieldId": 100103,
      "fieldName": "date",
      "value": "2018-08-20"
    },
    {
      "conceptName": "start-labour-agreement",
      "fieldId": 100093,
      "fieldName": "date",
      "value": "2018-09-01"
    }
  ],
  "durationDataFields": [
    {
      "conceptName": "labour-agreement",
      "fieldId": 100156,
      "fieldName": "duration",
      "value": {        "amount": 18,        "unit": "month"      }
    }
  ]
}
With repeating fields
Repeating fields are typically used in tables.
Assume the following table exists in some document with ID 1012966: (#emp refers to concept employees)
|| name                             || birthday        || status           ||
|| -------------------------------- || --------------- || ---------------  ||
|| #emp^first-names #emp^last-names || #emp^birthdays  || #emp^is-internal ||
With the following JSON-object:
{
  "documentId": 1012966,
  "outputFormat": "pdf",
  "language": "en",
  "repeatingStringDataFields": [
    {
      "conceptName": "employees",
      "fieldId": 100946,
      "fieldName": "first-names",
      "value": ["John", "Mary", "Pete", "Waldo"]
    },
    {
      "conceptName": "employees",
      "fieldId": 100947,
      "fieldName": "last-names",
      "value": ["Johnson", "Peterson", "Dickinson", "Gates"]
    }
  ],
  "repeatingDateDataFields": [
    {
      "conceptName": "employees",
      "fieldId": 100948,
      "fieldName": "birthdays",
      "value": ["1980-08-20", "1980-07-19", "1979-01-24", "1978-11-12"]
    }
  ],
 "repeatingBooleanDataFields": [
    {
      "conceptName": "employees",
      "fieldId": 100949,
      "fieldName": "is-internal",
      "value": [true, false, true, true]
    }
  ]
}
Creating anonymous links to documents
Using the API, you can create an URL to one or more documents, similar to the way anonymous links can be created in the GUI. Such URLs will allow anyone to login using a specific user profile and fill in th Q&A for one or more documents. Together with the other function calls below, this effectively allows the ClauseBase platform to be used for client portals, webshops, etc..
Similar to the GUI, the following options are available. Please check the anonymous links GUI page for more extensive details.
- userId — the anonymous user whose account should be used upon login
- docIds — mandatory array of at least one (and maximum 20) documents/binders that can be opened by the end-user through the hyperlink.
- expiryMinutes or expiryMoment — one of those optional but highly recommended fields can be used to ensure that the link expires at a certain moment. Either you can use expiryMoment to specify a specific date & time (in the UTC time zone), or you can use expiryMinutes to specify the number of minutes from the current moment.
Warning: The server check the current minute vis-à-vis the expiry minutes. So if you use expiryMinutes, specify only 1 minute of expiry, and happen to issue the request at the 58th or 59th second (e.g., at 11:13:59), there is a small chance that the resulting URL cannot be used at all, because by the moment the login is performed (e.g., at 11:14:01), the minute has passed.
In other words, specify a minimum expiry of at least 2 minutes.
- showPreview — (defaults to true) specifies whether the end-user should be shown an interactive preview (at the right side) of the document/binder that is being generated.
- exportPdf and exportDocx — (defaulting to false) specify whether the user should be allowed to export to PDF and/or Word DOCX.
- saveFolderId — optional file ID of the folder in which the end-user’s answers will be stored if he/she decides to send these answers back to the person who created the link. The person specified in the saveNotifyUid field (or, if omitted, the administrator) will then receive an email to notify about the saved file.
- exportIdentifier — optional string that can be used to differentiate anonymous links to the same file from each other. The exportIdentifier will show up in the reporting. Webshops and law firm client portals can for example include some customer or transaction identifier.
- InIFrame — if set to true, then the welcome page will not be shown to the end-user. Instead, immediately after login, the end-user will see the Q&A associated with the anonymous link.
- Note that this setting only allows a single document to be assigned.
- Also note that this setting causes the X-Frame-Options “SAMEORIGIN” setting to be removed from the page’s HTTP headers. (When InIFrame is not set to true, then the X-Frame-Options is set to SAMEORIGIN to avoid click-jacking attacks. Please be aware of the security risks involved with using iframes.)
- This setting is only available to enterprise accounts licensed for this option.
Please be aware that these links are completely anonymous — meaning that anyone in the world can use them before their expiry to access your documents. Depending on your license agreement, any document generated this way (whether by any of your employees, agents, clients or third parties) will be invoiced to you.
If you want to exceptionally blacklist an existing URL to prevent abuse, please contact us.
Other REST API calls
In addition to the main assemble_documents call, there are several other API-calls you can use.
- the all_documents_in_account call allows you to retrieve the ID, label and type (Document or Binder) of all Documents and Binders available in an account
- the all_styles_in_account call allows you to retrieve the ID, name and type (base paragraph settings, heading-style, page-settings, etc.) of all styles available in an ccount
- the datafields_in_document call allows you to retrieve the ID, label, type (integer, boolean, string, etc.) and associated Concept for each of the datafields used in a specific Document or Binder
- the conceptlabels_in_document call allows you to retrieve the Concept-ID, concept-description and default concept-label for all Concepts that are used in a specific Document or Binder
- the conceptlabels_for_concept call allows to retrieve the ID and contents of all the concept-labels for a combination of a certain Concept and language
- the customer_users call allows to retrieve the user-ID, first name, last name and email of every user of your customer (or a linked customer). You must be an admin in order to make this call
- the user_login_url call allows to get a short-lived (60 seconds) URL that will allow the requested an end-user to login. Please be aware that no two-factor authentication checks will be done.
- the create_customer call allows customers to create linked sub-customers
- the sub_customer_ids call returns the customer-ids of all linked sub-customers
- the create_user call allows to create new users, either in the account of the own customer, or in the account of a linked customer
- the find_users call allows to search for users (either in the account of the own customer, or in the account of a linked customer) by specifying a first name, last name and/or email address
- the customer_details call allows you to retrieve the details of a (sub)customer and its administrator