Disable clause
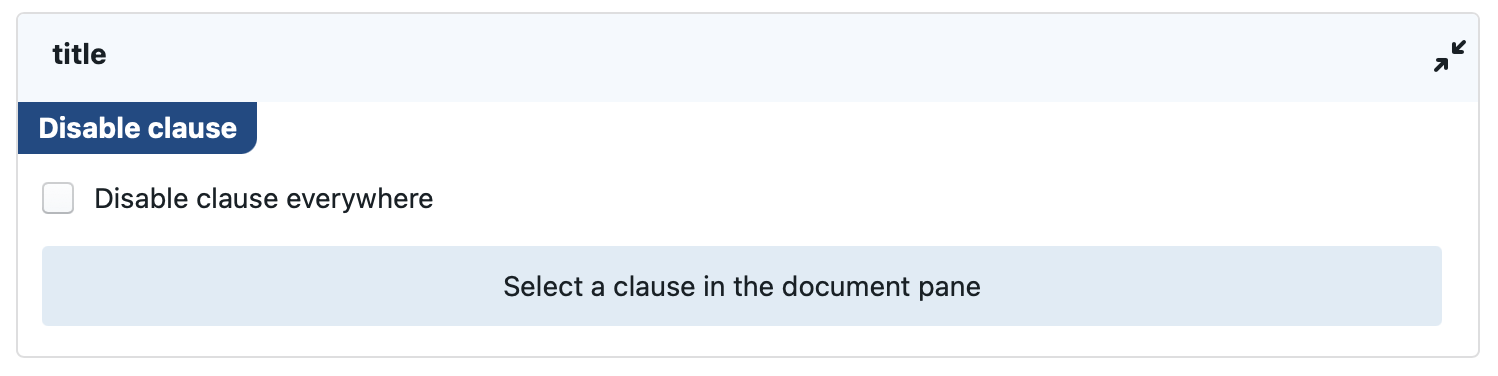
This change will remove a specific clause (and all its descendant clauses) from the document or binder.
In order to select the relevant clause, you will have to select the clause in a document or binder pane and click on the “use selected clause in document pane” button. You will then see a preview of the selected clause in the green box that appears.
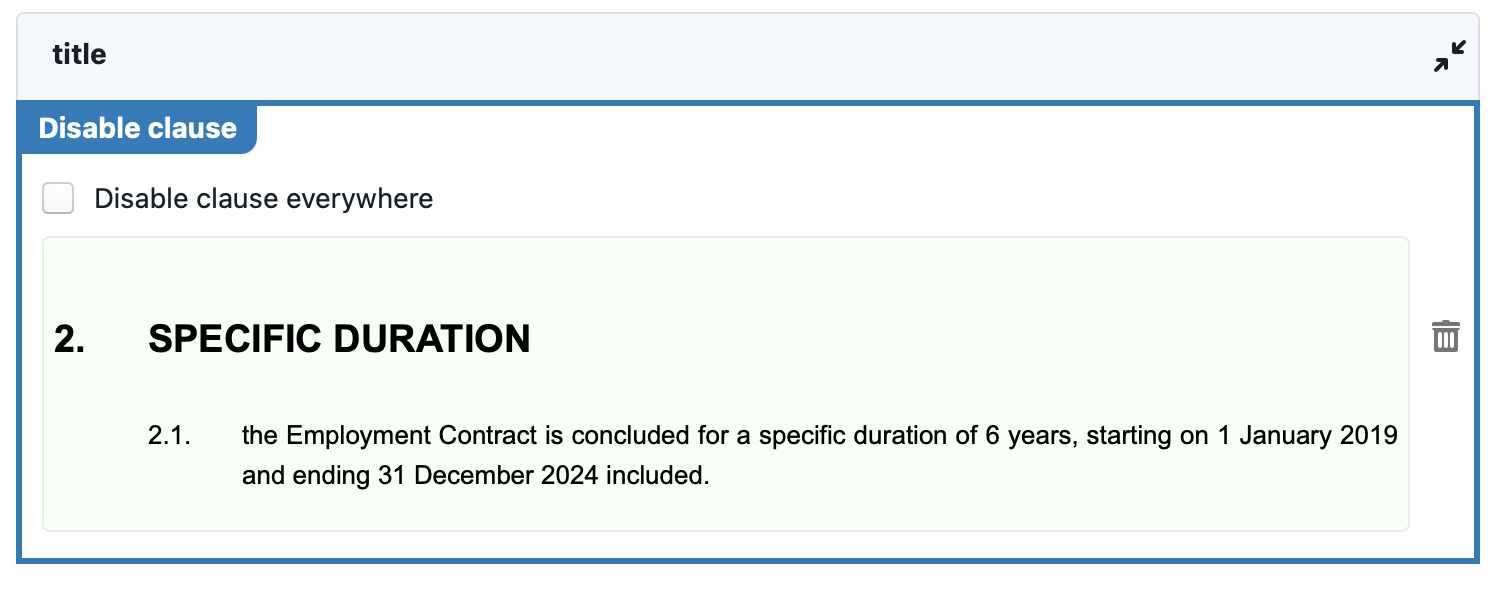
If you want to select another clause instead, then click on the trash icon  at the right side, and then select another clause.
If a certain clause happens to be repeated at different places of a document or binder, then you can optionally specify that all these instances of the clause need to be deleted. If this option is not activated, then ClauseBase will locate a clause by looking at the clause ancestors and the position of the selected clause to its closest ancestor.
For example, in the example above, the selected clause happened to be number 5 (salary). ClauseBase will therefore register that this clause is the fifth clause on the top-level.
At the moment that ClauseBase needs to apply this change, it may happen that the salary clause is actually no longer the fifth clause in the document, for example because some other clause before it was also deleted. ClauseBase will then use the first clause it can find at the same level.
Obviously, these difficulties in finding the correct clause are irrelevant when the “disable clause everywhere” option has been selected, because ClauseBase can then simply find all instances of the same clause, and delete them everywhere.
Be careful when simultaneously applying multiple disable/replace/insert changes that the same set of clauses, because the result can become difficult to predict.
For example, in change set A you may specify that under certain conditions, some subclause needs to be inserted to clause 23. If, in change set B, you then specify that all the subclauses of clause 23 need to be disabled, this may — or may not — conflict with your intentions under clause A.
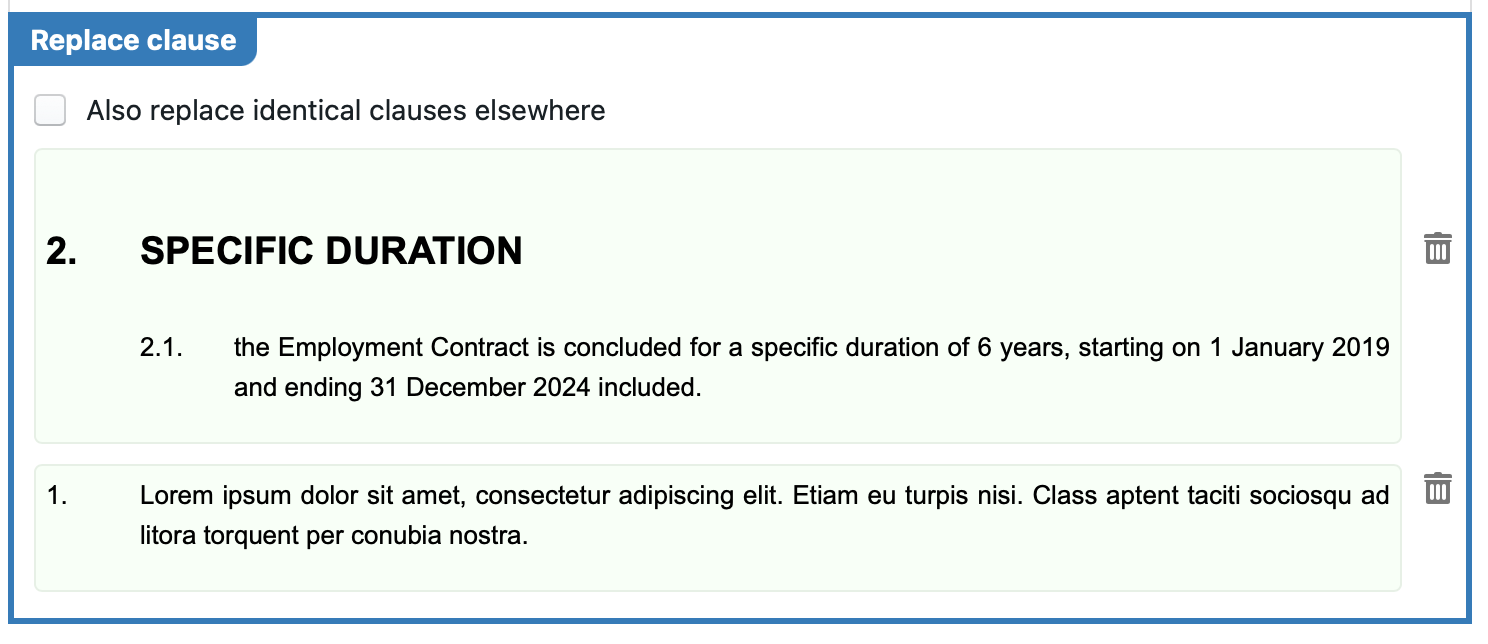
Replace clause
As its name implies, this change will replace a specific clause with another clause.
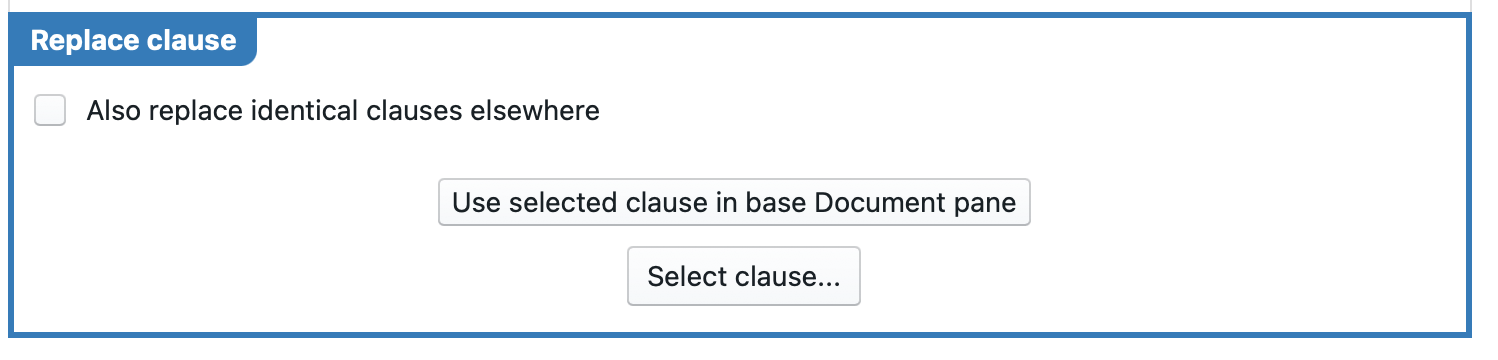
In order to use this clause, you will have to select a certain target clause in a document / binder pane, and then click on the “use selected clause in document-pane” button. In addition, you will have to select an alternative clause from the clause library by clicking on the “select clause…” button.
If you want to choose another target clause or replacement clause, you can click on the relevant trash can at the right side.
See the warning above as regards the combination of multiple disable/replace/insert changes.
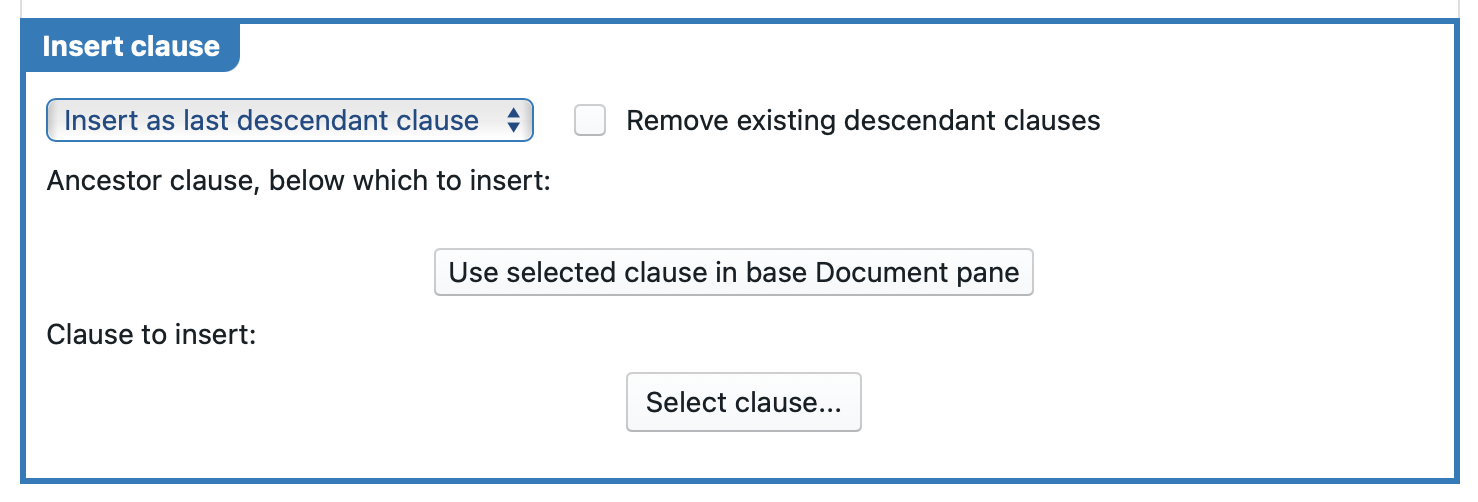
Insert clause
This change allows you to insert a clause at a specific location within the document or binder.
- In the document / binder preview pane, you need to select the clause that will act as the ancestor clause, i.e. below which the new clause will be inserted.
- You can choose the clause to insert by clicking on the “select clause…” button. A dialog box will then appear that allows you to navigate to the relevant clause in the file system.
- With the dropdown list, you can choose whether to insert the clause as the first or last descendant of the ancestor clause, i.e. the first or last subclause.
See the warning above as regards the combination of multiple disable/replace/insert changes.
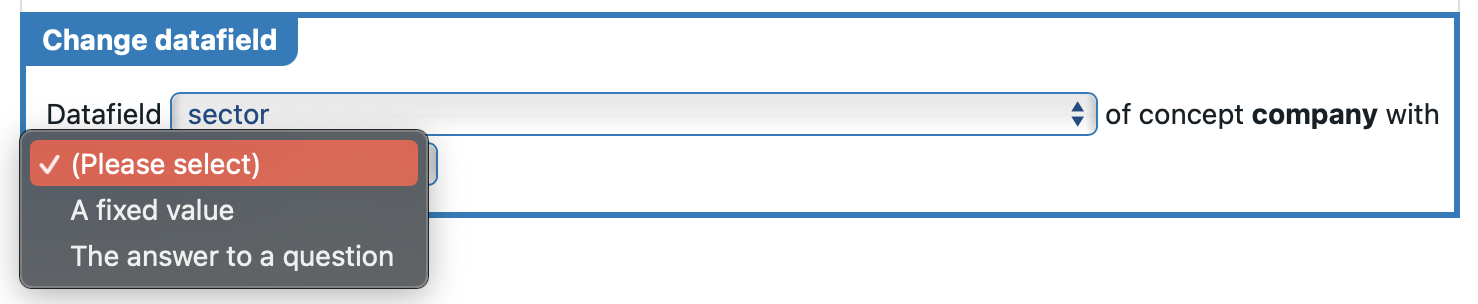
Change datafield
The primary means to change a datafield, is to directly bind it to a specific question by modifying the options of that question.
However, there exist situations where this is not enough — for example when:
- the same answer to a question needs to be inserted into multiple datafields
- an answer should only be inserted into a datafield when a certain condition is met
- under certain conditions, a specific value (not submitted by the user) should be inserted into the datafield
All such situations call for a “change datafield“.
To use this type of change, you obviously need to select the datafield that you want to select.

Next, you will have to choose whether to insert a specific value (i.e., a value that is not submitted by the user), or a value obtained from a user’s answer to some question.
Bulk change
A bulk change allows you to update several datafields at once. To use this functionality, several items need to be simultaneously prepared. Please refer to the separate page on bulk changes for more information.
Change term
This type of change is very similar to directly changing a concept-label in Assemble Document.
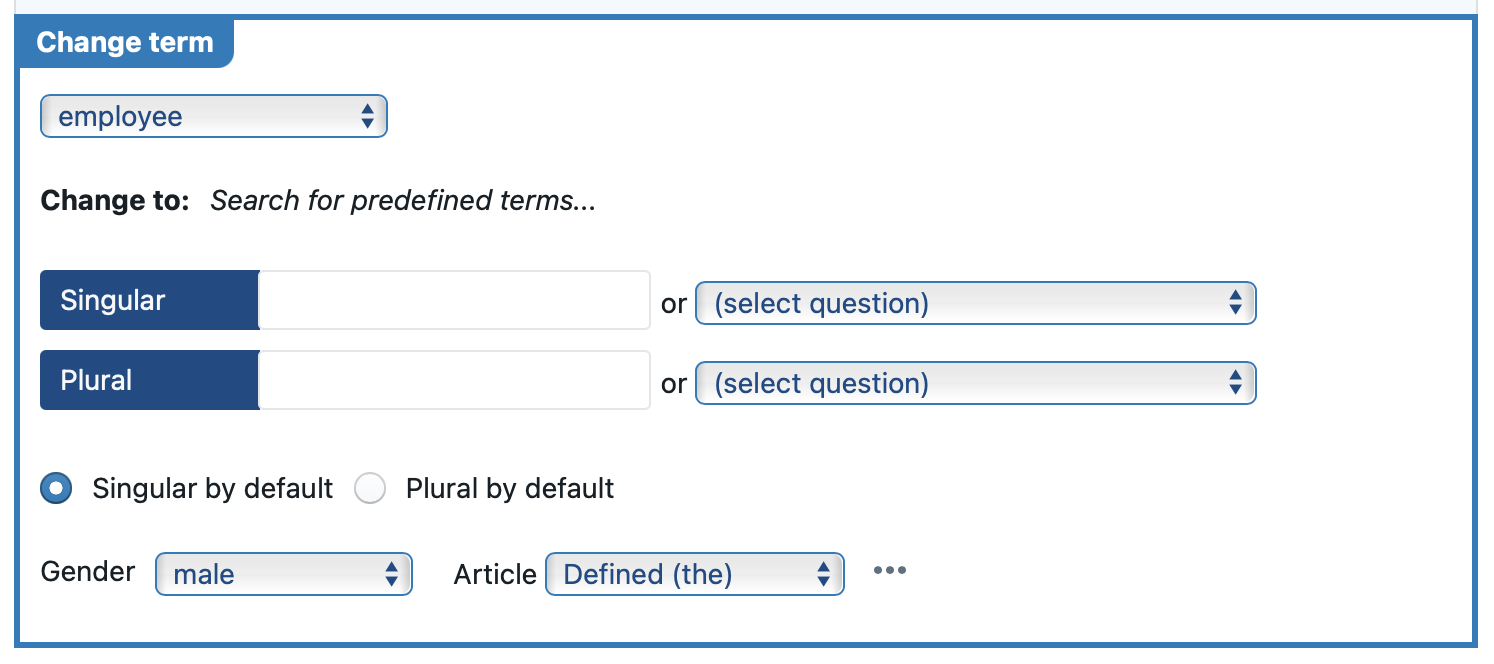
After having selected which term to change, you essentially have to choose where the new term will come from:
- either a specific value decided by you, by filling in the singular and/or plural boxes at the left side;
- or an answer submitted by your user, by choosing the relevant question in the dropdown list(s) at the right side
Note that the default number (singular or plural), the gender and the article cannot currently emanate from the answer to a question. If you have to provide different possibilities here, you will have to create separate change sets that are subject to different conditions, and populate those change-sets with different settings for change term.
Change styling
Through this type of change, the user of the questionnaire can change the document’s styling in the manner intended by the relevant change. Each aspect of the styling can be changed. Choose the relevant style category from the drop-down menu and configure it. Using the ![]() button, you can select one of the predefined default styles you have access to.
button, you can select one of the predefined default styles you have access to.
Shrink/expand clause
With the shrink/expand clause change set, the entire document or one or more clauses (depending on your selection) can be shrunk or expanded to the desired level.
Allow user to choose alternative clause
Adding this type of change allows a user to choose an alternative clause from one or more preselected clauses by clicking the  button in the document preview when completing the questionnaire.
This type of change can be configured by selecting the clause you want to be replaced in the document pane, checking whether you want identical clauses to be replaced and/or existing descendant clauses removed as well. Select an alternative clause by clicking  . Then provide a clause description which will be used to describe the alternative in the drop-down menu that the end user will be presented with when clicking the alternatives button. Multiple alternatives can be provided by clicking
  .
.
Allow user to disable clause
Works similar to the disable clause change type, but in this case the user gets the choice to disable the clause by clicking a garbage can icon  inside the document preview of the questionnaire. Select the relevant clause to be disabled.
In addition, a description must be provided, which will be used to describe the clause in the “deleted clauses” tab that will be shown in the questionnaire. In this tab, the user can re-enable any clauses he/she had previously disabled.
Change placeholder
Please see the detailed discussion of the placeholder system.
Change save / export settings
This change allows you control whether and how documents get exported in a Q&A context. These settings are roughly equivalent to the controls you can access in the toolbar of Assemble Document through the ![]() button.
button.
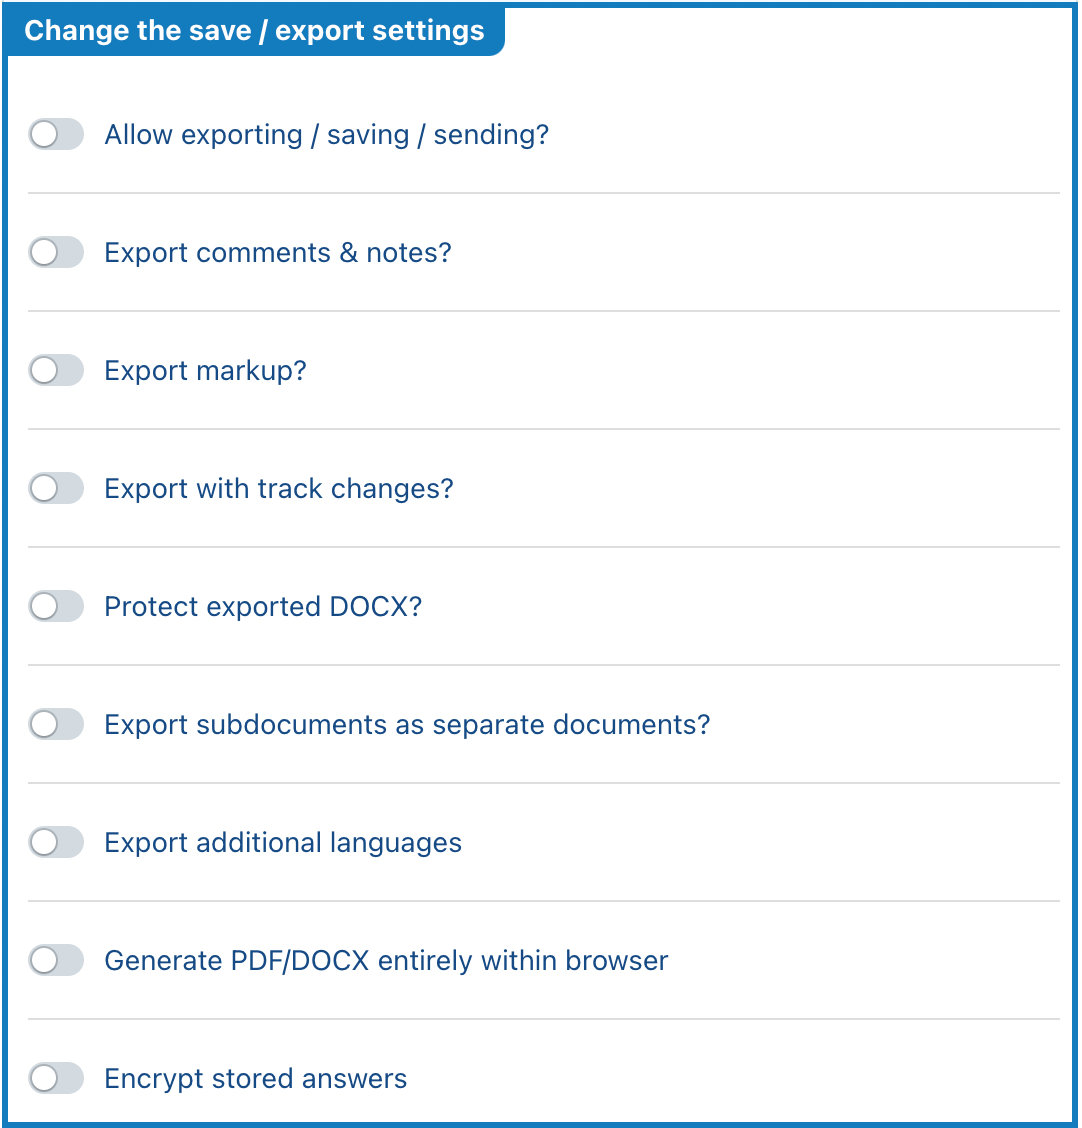
Structure of this change
This change has several different subsections (“Allow exporting / saving / sending?”, “Export comments?”, …) that deal with different aspects of the save/export process.
Starting from the following default status:
- allow exporting/saving/sending if the user’s administrator has not disabled this
- do not export comments/track changes
- do export markup, when present
- do not protect the resulting DOCX-file
- do not encrypt the answers saved by the users
… the software will run through each subsection of the change, and then check whether it’s enabled, through the slider control in the upper left corner. When the slider is indeed enabled, that subsection’s settings are then applied. When the slider is not enabled, no modifications for that subsection’s status will be applied.
This may seem a bit complicated at first, but actually grants you a lot of power, because it allows you to potentially combine multiple instances of the “save / export” change, each perhaps subject to different conditions.
For example, assume you make two different change sets (“Accounting” and “Legal”), each subject to a condition that narrows down the users to members of that department. For the Accounting Department’s change set, you then insert a save/export settings change that specifies that the resulting DOCX must always be protected. Conversely, for the Legal Department’s change set, you insert another instance of the save/export settings change, that specifies that the comments and “track changes” should always be exported.
In addition, you make a change set “US” — with a condition that narrows down the change set’s applicability to users from the US entities — that contains a third instance of the save/export change that automatically disables saving if a certain contract value threshold is exceeded.
As a result, a US-based accountant will have its DOCX export always password-protected, and additionally its saving capabilities disabled with the contract value is exceeded. Meanwhile, an accountant in Europe would only have its DOCX export password-protected.
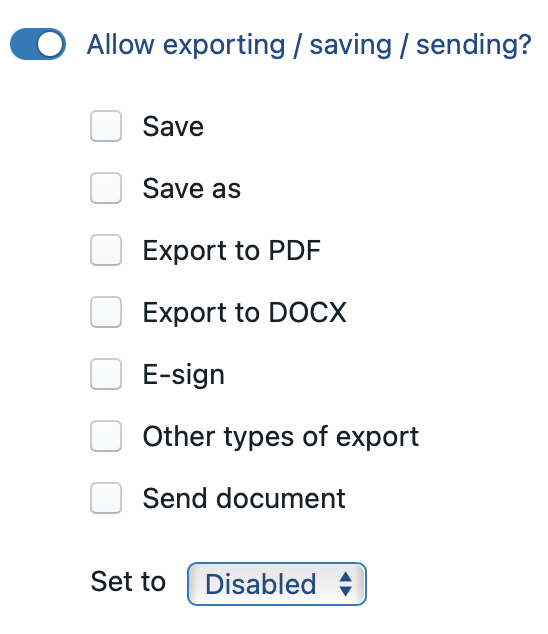
Subsection “Allow exporting / saving / sending?”
This subsection allows you to define whether the user is allowed to export, save or send a Q&A.
You should first select the scope of the change, and then define whether the actions in that scope are allowed or not.
For example, assuming there is only one change-set active, saving and PDF-exporting would be disabled if the change-set containing the following change happens to become active:
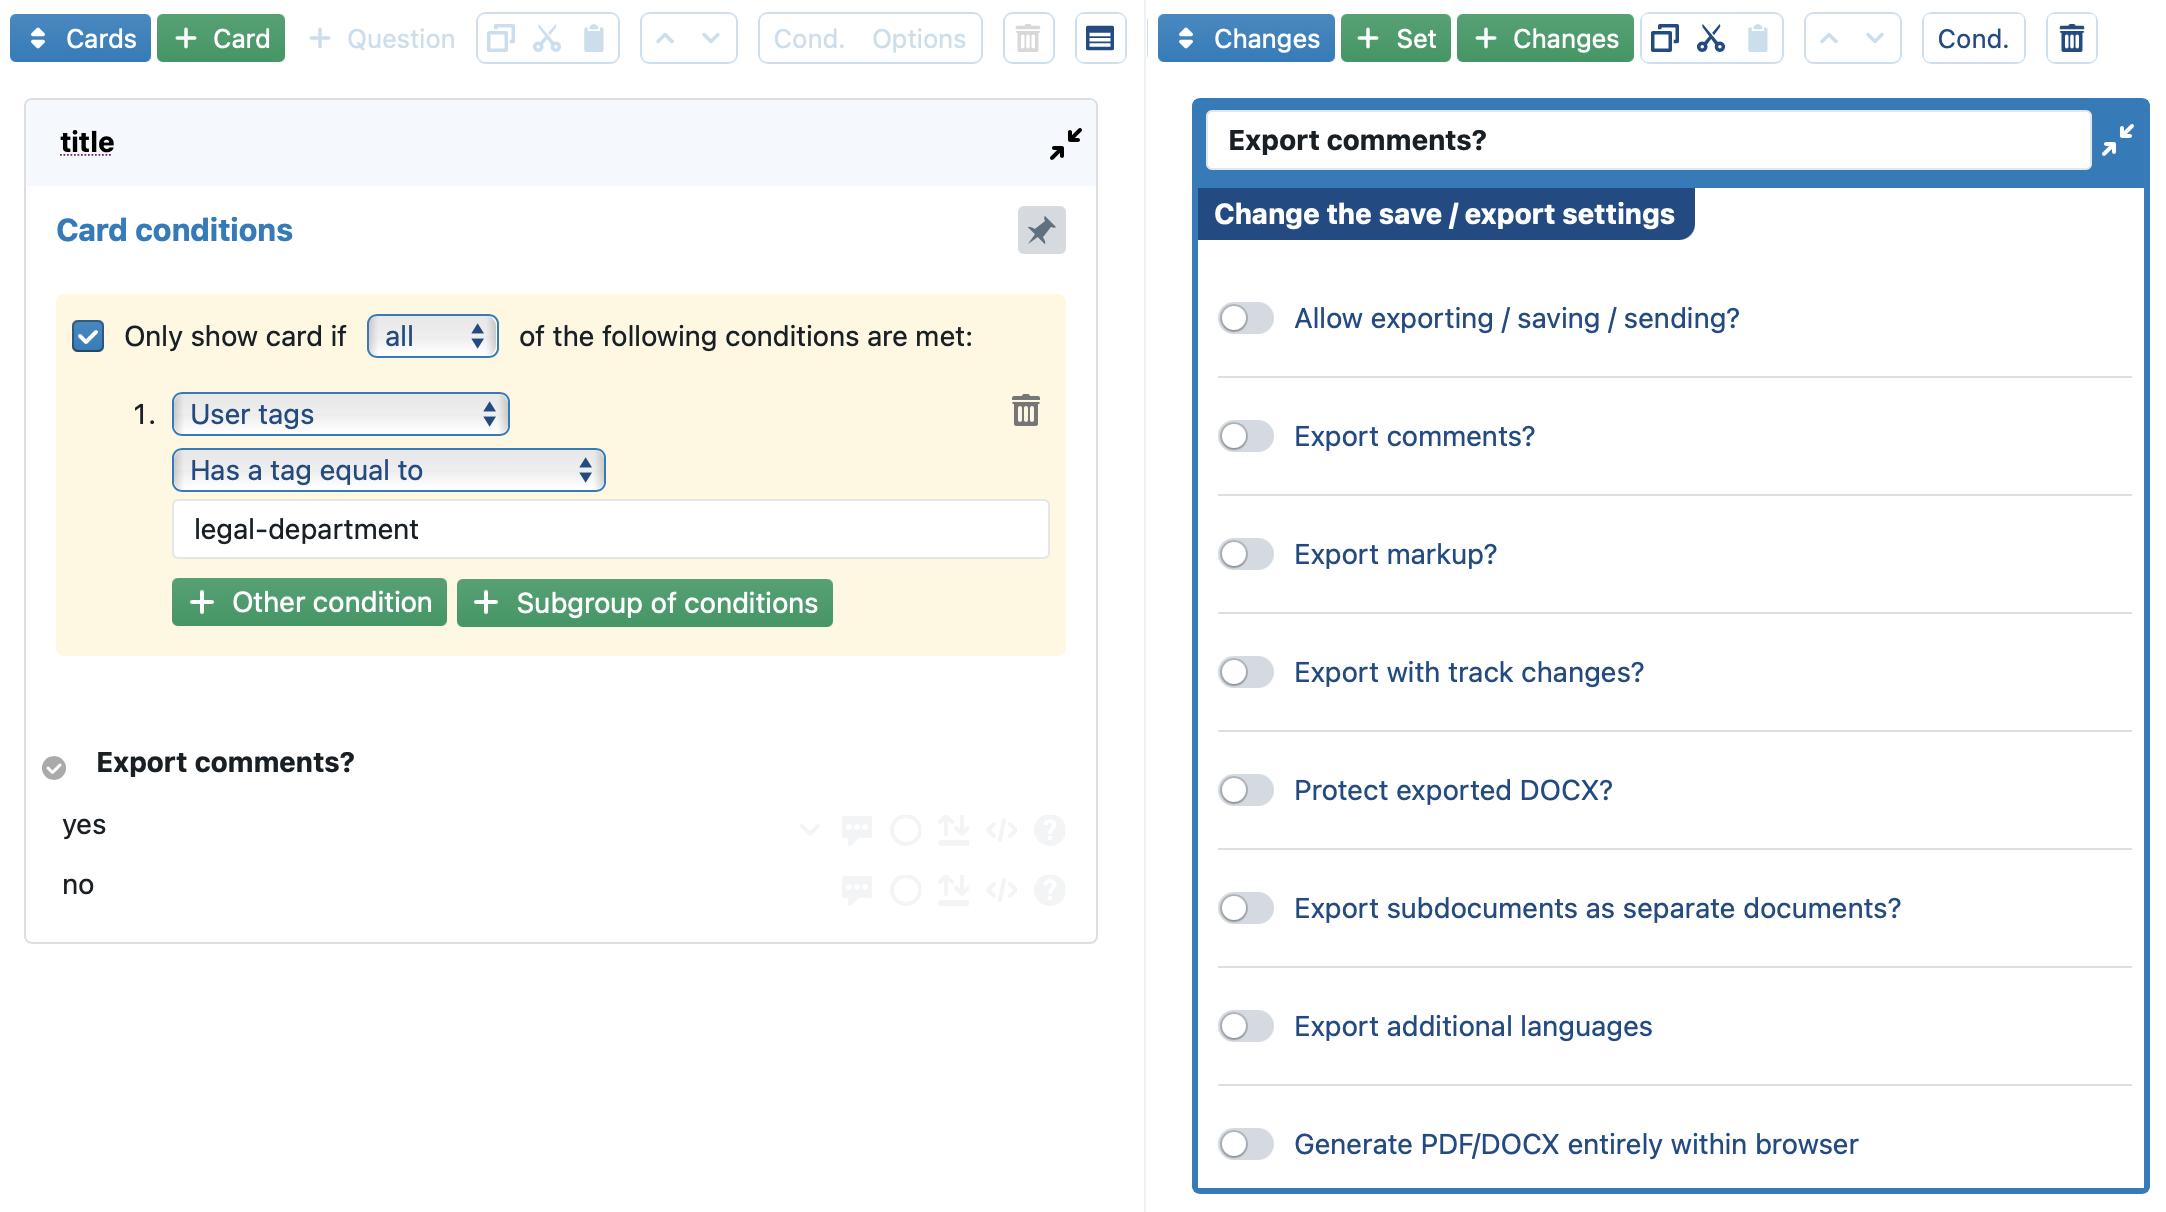
Subsections “Export comments?” and “Export markup?”
Both subsections have the same, simple structure. They essentially allow you to define whether or not comments / markup should be exported.
You can either enable/disable such export with a fixed value, or by coupling the value to the answer to a true/false question.
For example, in the screenshot below, you can see that the change-set subject to a condition that limits the applicability of the change-set to users of the legal-department. For those users, it then enables the exporting of comments.

A similar situation can be achieved by coupling the export of comments to a question that will only be shown to users of the legal department:
Subsection “Export with track changes?”
This subsection allows you to specify whether the exported document should contain track changes (aka redlining), obtained by comparing the original document underlying the Q&A with the actual state of the document, as exported by the user.
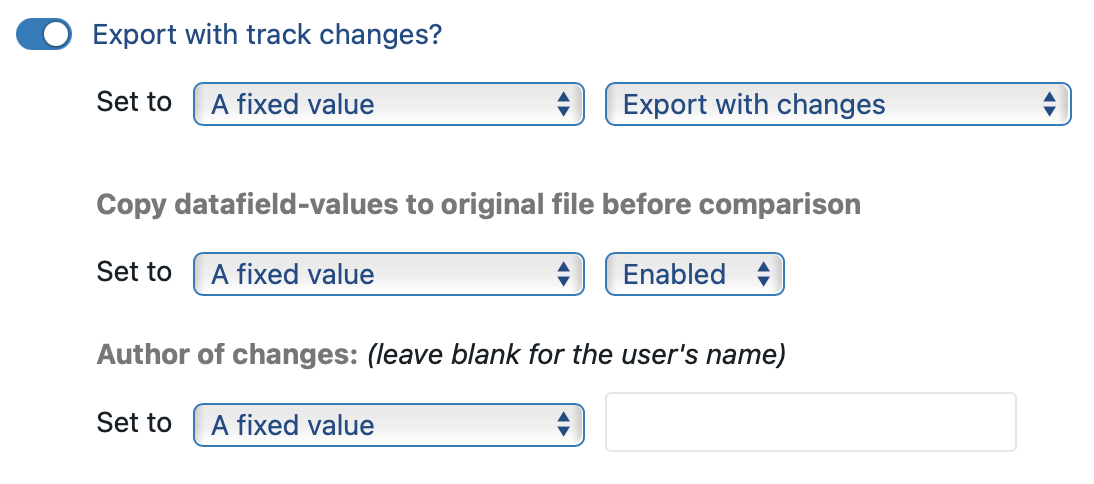
Similar to the corresponding button in Assemble Document, four options are possible to specify what to export:
- Export with no changes — effectively disables any output of track changes (the default setting).
- Export with changes — exports a PDF or DOCX file that contains track changes / redlining.
- Export with changes & without changes — exports a “clean” PDF/DOCX version and a version containing track changes/redlining.
- Export with changes in PDF & version without changes — similar to the previous option, but always exports the changes into a PDF file, even when output in DOCX was requested.
The “Copy datafield-values to original file before comparison” allows you to specify whether, before the software compares the original document and the resulting document, the datafield-values should be (temporarily) copied to the original file. If this is enabled, then inserted datafields will not show up as changes in the comparison.
In addition, you can specify the name of the “author” of the track changes. If nothing is filled in, then the Q&A’s end-user’s name (or “anonymous”, for anonymous logins) will be used.
You can also couple these settings to the answers to questions:
- Simply couple the author of the changes to a text-based question.
- You can also couple the setting of what to export to a text-based question. The software expects the value of the answer to be identical to either “only-clean”, “only-changes”, “both” or “both|pdf-changes” — any other value will be ignored. Most likely, you will want to put these values into predefined answers.
Subsection “Protect exported DOCX?”
Through this subsection, you can protect generated DOCX files (it has no effect on generated PDF files).
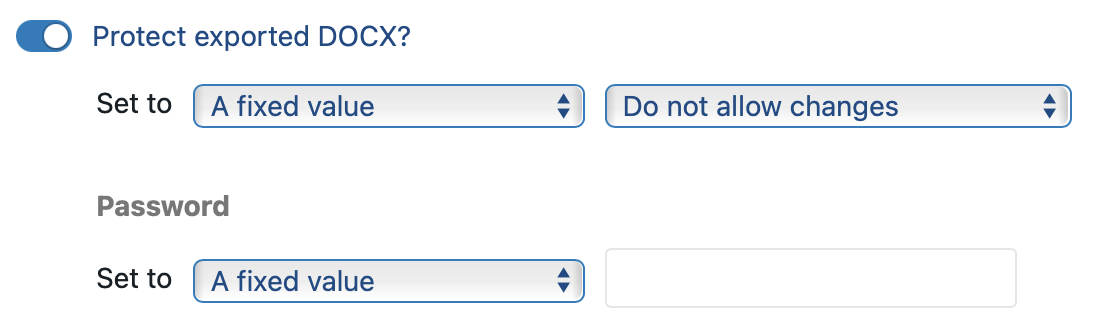
Similar to the corresponding button in Assemble Document, five options are possible to specify what to export:
- Do not apply protection in .DOCX — effectively disables any protection (the default setting)
- Do not allow changes — the DOCX file will become read-only
- Allow only comments — users can only include comments
- Only allow completing forms — allow the contents of MS Word form controls (e.g., those generated through the @checkbox special function) to be changed, but no other changes
- Enforce tracking of changes — allow changes, but enforce marking them with “track changes”, so that all changes are visible
In most cases, you will want to set a password, to ensure that recipients of the .DOCX file cannot easily disable the protection.
You can also couple these settings to the answers to questions:
- Simply couple the password to a text-based question.
- You can also couple the setting of the protection type to a text-based question. The software expects the value of the answer to be identical to either “no-protection”, “only-changes”, “read-only”, “only-comments”, “only-forms” or “only-revisions” — any other value will be ignored. Most likely, you will want to put these values into predefined answers.
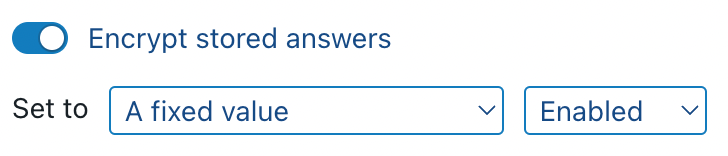
Subsection “Encrypt stored answers”
While ClauseBase is designed to minimize the collection of personal data — for example, generated documents are only stored in the server’s memory for up to 120 seconds — there are situations when data minimisation is of the utmost importance. In such situations, you can opt to encrypt the answers stored by the end-users, by enabling “Encrypt stored answers”.
When encryption is enabled (and assuming a user’s right to save answers is not disabled), the user will see an additional “Open…” button at the top of the Q&A.

When clicking the Save (or Save as…) button, the following dialog box will be presented towards the end-user:
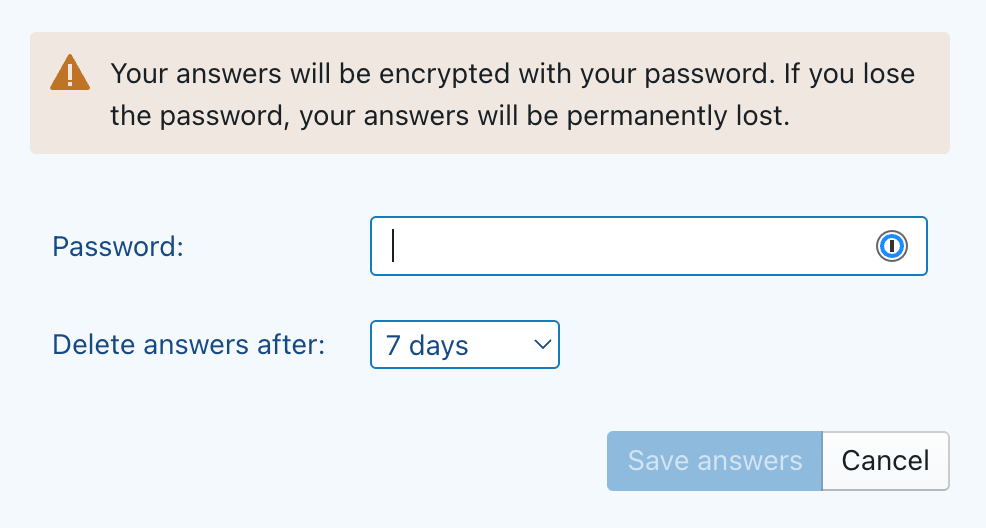
In this dialog box, the user can enter a password (minimum 6 characters) and select a retention term (between 1 day and 1 year). The server will automatically delete the answer file once this retention term has passed.
The answers will be encrypted with AES/CBC/Pkcs7Padding, with a 256 bit key. Note that, for maximum security, this encryption is performed at the browser side, so the password and the unencrypted data will never ever reach the server — all the server will ever see and store, is the encrypted data.
When the Save answers button is pressed, the encrypted answers are saved on the server. The end-user will then see a dialog box that presents the randomly chosen filename (16 characters, case-sensitive) on the server. By clicking on the icon next to the filename, the filename can be copied to the computer’s clipboard.

In order to open stored answers, the end-user will have to click on the Open… button, and submit the filename (i.e., the 16 characters with dashes) and password. If this combination is correct, the previously stored answers will be “pasted” into the currently opened Q&A, overwriting any other values currently active in the Q&A.
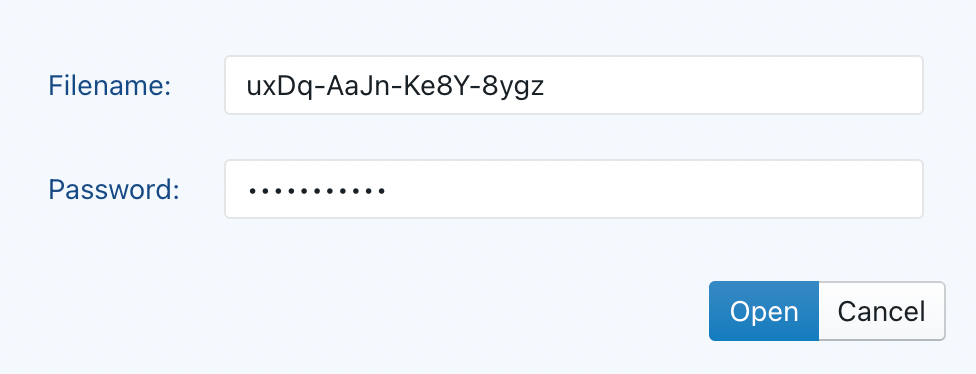
Opening previously stored encrypted answers can be done by anyone with access to the Q&A, by submitting a valid combination of the filename and password in an opened Q&A. The combination of the unique filename (over a trillion trillion combinations) and the password is very secure.
Be aware that — in light of the requirement to provide a password and filename — answer encryption takes precedence over the Allow storing & sending answers and Allow sending answers settings in the links created for Q&As. Accordingly, the toolbar above will be shown (instead of the toolbar to send back answers).
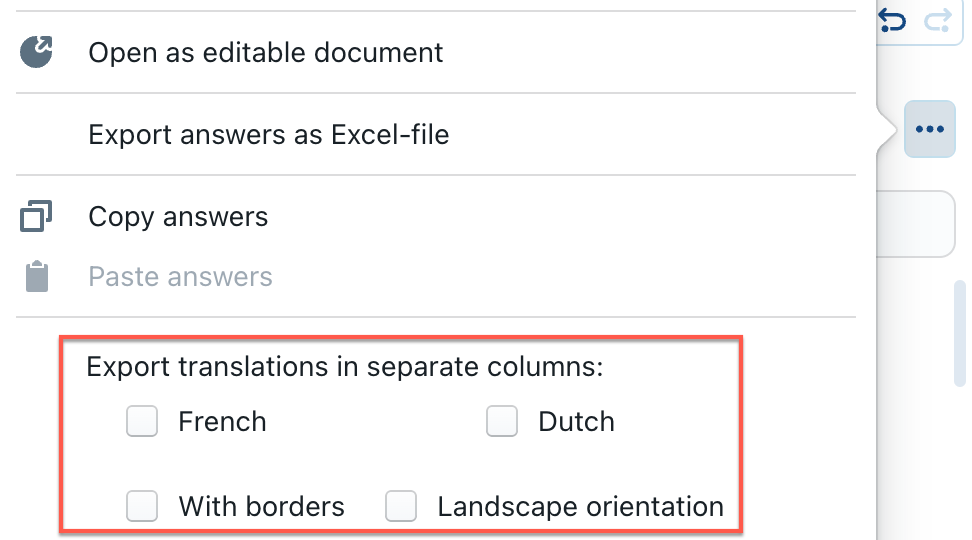
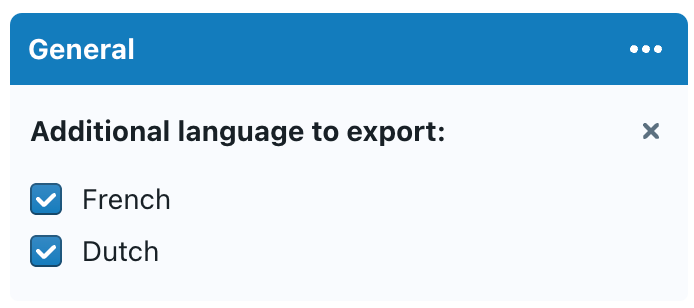
Subsection export additional languages
This option allows you to configure which additional languages should be exported under certain conditions. So, in a way, it is the automated equivalent of the following popup-menu in the upper-right corner:
The first approach is easy to understand: go for a fixed value — e.g., the combination of English & French. (Of course, by including multiple of these change types, each with a different set of languages and subject to different conditions, you can also make the choice dynamic in a certain way.)

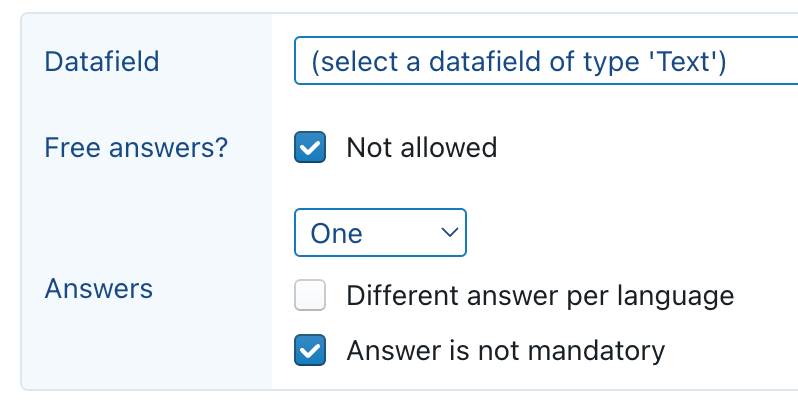
The second approach is to make the combination dependent on the answer to a certain question. You can either go for a text question with a single answer, or for a text question with multiple answers. In both cases, the answer should be the lowercase two-letter ISO code of a language in order to be recognised (e.g., “de” for German, “fr” for French, “en” for English, and so on).
For example, assume you have the following question.

Remember we are talking about additional output languages. As shown in the screenshot, you will probably want to make each predefined answer subject to a condition that hides it when the currently visible language happens to be that language (e.g., hide English when the output language is in English), to avoid confusion from your user.
Notice that the values are the two-letter codes, while the labels can contain the entire, full-length name of each language (preferably even translated).
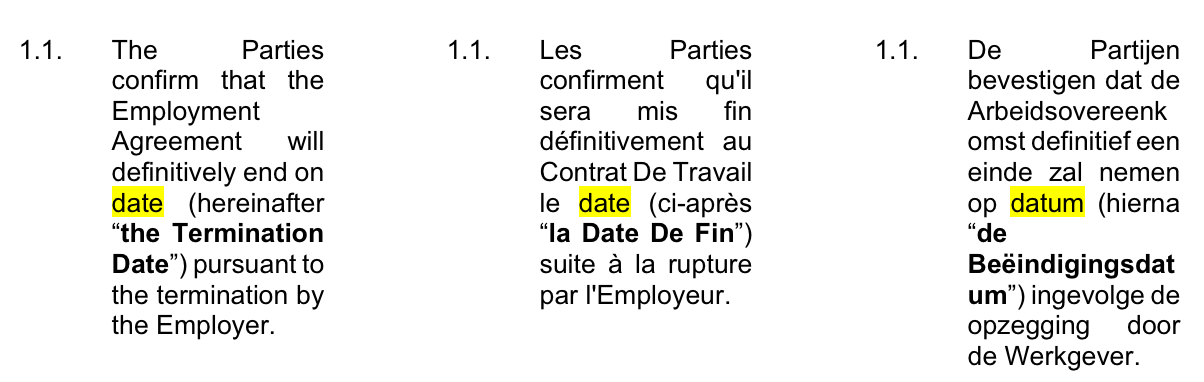
The currently active output language is completely ignored. For example, if the output would currently be set to English and the answer to your desired question would include English as well, then that English will simply be ignored (as it would not make sense to have two output columns in English).
This could then be couple to the following export change, which refers to that exact question:

When the question has only one possible answer, then one additional language can be chosen:
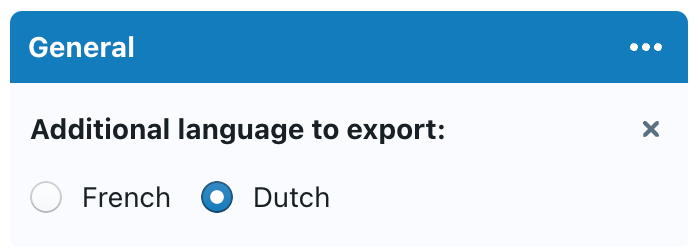
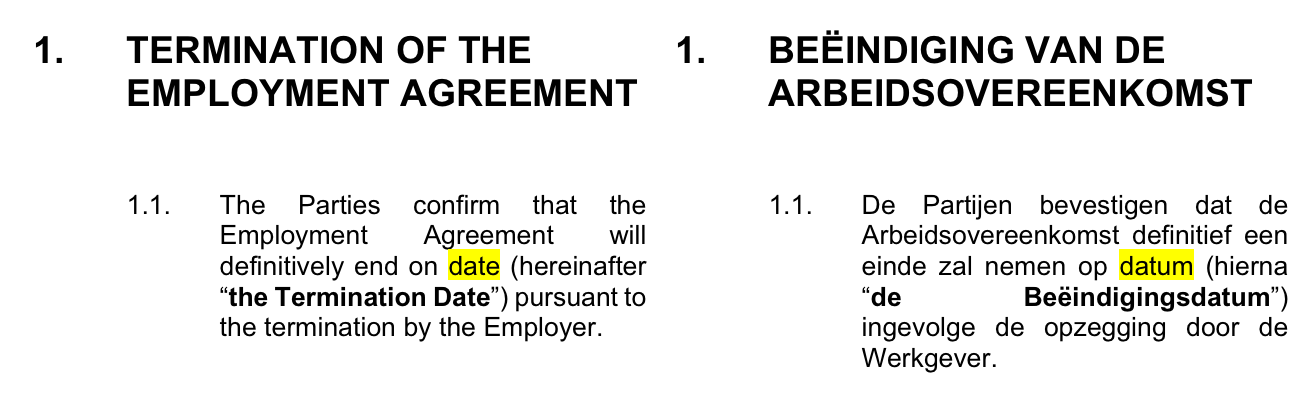
If the user then selects an option, the output will include an extra column with that language. For example, when the currently shown output language is English, and the user chooses the additional language Dutch, then following two-column output would be triggered:
To remove that extra language again, the user has to click the small “x” in the upper right corner of the question. Alternatively, you could insert a “No other extra language” option (and give it some random value); when chosen, the software will ignore that value and treat the answer as having no valid answer, so no valid additional language would get exported.
When you activate multiple answers for the question, you could even allow multiple additional languages to be selected:
… would result in the following output:
In such scenario, you probably also want to activate the landscape orientation:

You can even consider making this orientation conditional, e.g. only activate the landscape orientation when more than one additional language is chosen. You can do so by adding two export-option changes, and subjecting the first change subject to the condition that the additional-languages-question “has more items than …”; while the second change would be subject to the opposite condition.