Line break
If you want to start a certain word on the next line, it is not sufficient in ClauseBase to simple hit Return/Enter, because ClauseBase ignores a single Return/Enter characters, and starts a new paragraph when you insert two or more Return/Enter characters.
You can insert a line-break by inserting two percentage-signs (%%). For example:
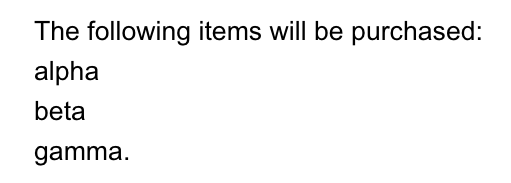
The following items will be purchased: %% alpha %% beta %% gamma.
Will be printed as follows:
There is a huge difference between inserting a line break and starting a new paragraph. A new paragraph will insert another paragraph number, and may also receive extra spacing due to the space above / below styling settings. Conversely, a line break simply moves new text back to the left side of the paragraph, while technically remaining within the same paragraph.
In Microsoft Word, you can insert a line break by pressing Shift-Enter/Return (as opposed to simply pressing Enter/Return, which will create a new paragraph).
Deviating styling
In principle, all paragraphs within the same clause (file) will be styled in the same manner. While you can apply different styling through the “custom styling” settings of a file, all of this custom styling will be applied to allparagraphs.
In most cases, this is exactly what you want. However, there are situations when you want one of the paragraphs to receive a special styling that deviates from the other paragraphs of the same file. For such special situations, you can insert formatting codes between % ... % , right after the bullet (*) or numbering (1., 2.1., …) of the paragraph. If you want to apply multiple exceptions at once, separate them by comma’s. For example:
1. This paragraph will be printed with the regular styling that happens to apply to this clause.

2. % align center, font color #aaa, font name Courier % This paragraph will be centered, shown in light grey, in font Courier.

3. This paragraph will be printed in the same (regular) styling as the first one.
The following formatting codes are available — note that they all correspond to the base styling settings:
| Code | explanation |
|---|---|
align left | left-align the paragraph |
align left first line | left-align the paragraph, with the first line indented |
align left hanging | left-align the paragraph, with the bullet or number “hanging” at the left |
align right | right-align the paragraph |
align center | center the paragraph |
align justified | justify the paragraph |
align justified first line | justify the paragraph, with the first line indented |
align justified hanging | justify the paragraph, with the bullet or number “hanging” at the left |
indent left xxx cm/mm/pt/i | set the left indentation (or the first line indentation) of the paragraph |
bold true (or simply bold) | make the text bold |
bold false | make the text non-bold |
italic true (or simply italic) | make the text italic |
italic false | make the text non-italic |
underline true (or simply underline) | underline the text |
underline false | remove any underlining from the text |
regular caps | print the text with regular caps |
small caps | print the text in small-capitals |
all caps | print the text in all-capitals |
keep with next true (or simply keep with next) | keep the paragraph together with the next paragraph, on the same page |
keep with next false | don’t force the paragraph to be printed on the same page as the next one |
keep lines together true (or simply keep lines together) | ensure that all lines of the paragraph are printed together on the same page |
keep lines together false | don’t force the lines of the paragraph to be printed together on the same page |
line spacing xxx | set the line spacing to the specified amount (as a percentage, e.g. 100, 150 or 200) |
page break before true(or simply page break before) | ensure that this paragraph is started on a new page |
page break false | don’t force this paragraph to be started on a new page |
space above xxx cm/mm/pt/i | insert the specified amount of spacing above the paragraph |
space below xxx cm/mm/pt/i | insert the specified amount of spacing below the paragraph |
space left xxx cm/mm/pt/i | insert the specified amount of spacing at the left of the paragraph note that any such space will be additional space, added on top of the left-indentation that already happens to apply to the paragraph |
space right xxx cm/mm/pt/i | set the right-indentation of the paragraph to the specified amount |
font size xxx cm/mm/pt/i | set the font-size to the specified amount (typically in points — pt) |
font xxx (or simply font) | set the font (xxx can be Arial, Arial Black, Calibri, Cambria, Courier, Georgia, Gill Sans, Impact, Lato, Lora, Montserrat, Noto Sans, Noto Serif, Palatino, Roboto, Source Sans Pro, Times, Tahoma or Verdana) |
font color #xxx (or simply font #xxx) | set the font color to the specified colorThe font color is specified in so-called CSS hex format, which is a combination of either 3 or 6 hex characters (a number or a / b / c / d / e). For example, #FF0000 is pure red, while #22B61E is a green variant. There are numerous websites and software programs that can help you find the right color — see for example https://htmlcolorcodes.com/ or https://www.w3schools.com/colors/colors_hexadecimal.asp |
marginal | Inserts a marginal number at the left side of the paragraph (as if @marginal would have been invoked)Note that the number will only be shown in body paragraphs or headings for which the numbering is hidden. |
seq "xxx" | inserts a sequential number of the specified list-name at the left side of the paragraph (as if @seq(xxx) would have been invoked)For example, % seq "figures" % would insert a sequential number for the increasing list figures.Note that the number will only be shown in body paragraphs or headings for which the numbering is hidden. |
Adding deviating styling to paragraphs in snippets
It is possible to add deviating styles to paragraphs that are included as internal snippets. However, you then have to make sure that the snippet is treated as an entire paragraph (instead of a mere part of a paragraph) by starting the content with a number. For example, in the code below, paragraph number 1. must be added to ensure that the % page break before % is recognised.
{#contract^value > 5: @WITH | else: @WITHOUT}

WITH =
1. % page break before % title with break

WITHOUT =
2. title without break
Signature & dotted tab
Most contracts will contain a signature section, which will typically involve printing a dotted line.
Inserting such dotted line is actually not so easy to do correctly in Microsoft Word.
Technically, the best manner is to use a right-aligned tab stop with a dotted (…) leader. See, for example, https://www.howtogeek.com/266307/how-to-add-a-tab-leader-to-a-tab-stop-in-microsoft-word/
ClauseBase allows you to easily insert such a dotted line, by inserting % signature % at the start of the paragraph, right after the number or asterisk. This will not only ensure that the dotted line is inserted, but also that sufficient space above & below the paragraph is available to make room for large signatures.
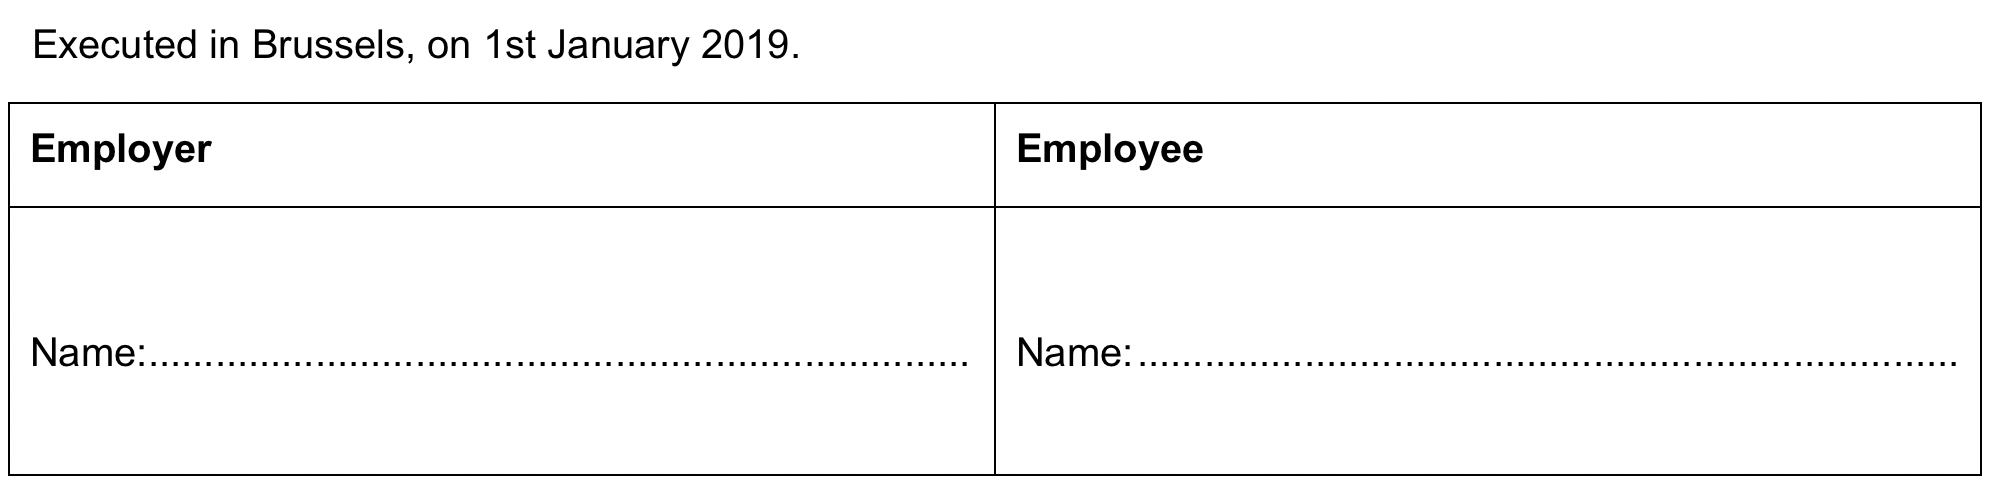
For example,
Executed in Brussels, on #contract^date.

|| ~Employer~             || ~Employee~        ||
|| %signature% Name:      || %signature% Name: ||
Will be printed as follows:
Instead of using % signature % you can also use % dotted % . This will also insert the dotted line, but does not automatically create space above & below the paragraph.
Exclamation marks before datafields
When you insert a datafield — e.g. #employee^name — it will be replaced by its value. However, when no value has been assigned yet, the result will be that:
- a yellow placeholder box will be inserted when the datafield was used within body text, to invite the end-user to provide a value
- the datafield will be replaced by the value
undefined, when used inside conditions and calculations (depending on the condition or calculation, this may or may not lead to an error)
You can reverse this behaviour by adding an exclamation mark just before the datafield-name, e.g. #employee^!name. Accordingly, the following will happen:
- inside body text, in most cases* no more yellow placeholder box will be shown when no value has yet been assigned to the datafield — in other words, the datafield is simply skipped in the resulting text
- inside a condition or calculation, a yellow box will be shown, to invite the end-user to provide a value
This exclamation mark helps to resolve the following situations:
- in body text, it is not always necessary that a datafield has a value assigned to it, so you may not always want to force the end-user to submit a value
- Example: in some countries, only some citizens will have a middle name. When you include something like
#employee^first-name #employee^middle-name #employee^last-namein the body text, you may want to force the end-user to fill in a first name and last name (because those must always be submitted in order for a contract to make sense), but you may not want to show a yellow box for the middle name, because employees with a middle name are an exception in your country. In such situation, the missing middle name will not trigger a yellow box, but it can still be submitted in other ways (e.g., in the data dashboard, or through a question in the questionnaire)
- Example: in some countries, only some citizens will have a middle name. When you include something like
- Some conditions and calculations only make sense when a certain value is available. If that value is not available, the calculation should immediately stop, and the user should be invited to submit the missing value.
- Suppose, for example, that in a contract with a defined duration, you would like to calculate the termination date through
{#contract^start-date + #contract^duration}. If either the start date or the duration is missing, ClauseBase will show a “missing value” error. It will be much more friendly to instead invite the user to submit the missing value — which will be the case when you use{#contract^!start-date + #contract^!duration}instead.
- Suppose, for example, that in a contract with a defined duration, you would like to calculate the termination date through
Careful thought must be given to the combination of an “else” block in a (set of) condition(s) and the use of an exclamation mark. In principle, the text behind the “else” block should be shown in case the other condition(s) in the set are not fulfilled.
However, the exclamation mark forces the user to assign a value to the relevant datafield. This means that the condition(s) will only be evaluated (and the relevant text shown) after the value has been assigned. As a result, the text in the “else” block will not be shown until a value has been assigned to the relevant datafield. Take this into account as this may, in some cases, not be the behaviour you intended.